The Basic Attention Token (BAT) is a utility token based on the Ethereum blockchain and has an important use case – its used within the Brave browser ecosystem. It is used as a billing unit for the blockchain-based web browser, Brave Browser. It aims to revolutionize the online advertising industry by protecting users’ privacy, eliminating middlemen to reduce ad fraud, and sharing revenue with users. With already over 5.5 million active users, the Brave Browser is a very promising project, from which the Basic Attention Token price could benefit greatly.
In the following article we introduce you to four brokers and exchanges where you can buy the Basic Attention Token. Before you read through the individual reviews and tutorials, you have to make an important decision regarding the storage of BAT: Do you want to manage the Basic Attention Token on your own wallet or do you want to give the responsibility to a broker or a cryptocurrency exchange?
The establishment of a wallet is an additional effort that takes up more time. However, setting up and maintaining the wallet is far less difficult and time-consuming than in the early days of cryptocurrencies. Most wallets are already designed to be suitable for beginners as well as advanced investors. In addition, you should bear in mind that by handing over responsibility to an exchange or broker, you are also handing over control over your cryptocurrency. When you use a wallet, you (usually) have sole control over your private key, which ultimately reflects the ownership of your cryptocurrency.
We therefore recommend that you take the time to set up a wallet. You should also keep in mind that exchanges and brokers are popular targets for hacker attacks. The wallets offered by the platforms offer significantly less security than, for example, hardware wallets or desktop/mobile wallets. At the end of this article we will show you how to create and manage a free Basic Attention Token Wallet. But if you’re investing bigger sums in BAT, you should consider buying a hardware wallet like our test winner, the Ledger Nano X.
Below you will find the instructions for the following brokers and exchanges:
Buy Basic Attention Token on Litebit
Litebit.eu is a broker based in the Netherlands that offers cryptocurrencies for customers in Europe (payment by Euro). From our experience of many years it concerns a reliable and customer-friendly broker. Because Litebit is based in the Netherlands, it is regulated under European law and therefore has very high safety standards. For us Litebit.eu is the first choice in Europe to buy the Basic Attention Token by SEPA bank transfer, SOFORT, credit card or GiroPay.
>> Sign up on Litebit now to buy the Basic Attention Token* <<
Limits for the purchase of BATs
At Litebit there are different verification levels (so called “Tiers”) and associated limits, how much you can buy daily, weekly or monthly in cryptocurrencies. The more personal data you verify with Litebit, the higher your limits will be. Litebit has a total of three different verification levels.
The first level – “Tier 1” is activated by the initial registration and allows you to invest 350 Euro per day, 1.050 Euro per week and 4.200 Euro per month. Level 2 (“Tier 2”) is the address verification. Level 2 requires that you scan the front and back of your identity card and upload it to Litebit. In addition, you must include a proof of your residence. This can take the form of an invoice, e.g. for electricity, water or the Internet. Level 3 (“Tier 3”) is the ID verification. For this a Litebit employee will contact you via Skype in a video call. During the phone call you have to confirm your identity with your identity card. In “Tier 3” you can buy cryptocurrencies up to a limit of 500.000 Euro per month.
The following table shows you an overview of verification levels and limits per day, week and month:
The values from the previous table are to be understood as maximum amounts. Depending on the payment method, this value may differ again (here: per day):
Guide: Sign up on Litebit.eu
To buy BAT, you must first register on Litebit. The first step is to create an account with the broker. To do this you have to go to the website of litebit.eu (click!)* and click the button “Register” in the upper right corner. As you will deposit Fiat currencies into your account, Litebit is required by European law to request some personal information at the time of registration.
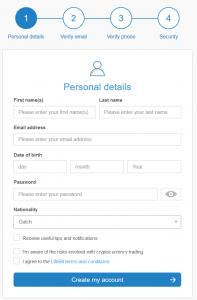
As soon as you have entered all data, you can click the button “Create account”. You will then receive an email from Litebit containing a confirmation code. Litebit hereby verifies your (valid) e-mail address. You have to enter the code from the e-mail on the Litebit website. In the next step Litebit will also verify your phone number. For this you will receive a code via SMS, which you also have to enter on the website.
The last thing you need to do is set up a two-factor authentication. By default, LiteBit uses two-factor authentication via SMS. Every time you log in, this type of two-factor authentication sends you an SMS with a code that you must enter on the website. Litebit also offers you the possibility to secure your account with the Google Authenticator. Both solutions function smoothly and safely in practice. But SMS authentication is certainly the simpler solution (because there is no effort to set up the Google Authenticator App).
After completing these three steps, your account at Litebit is set up. You already meet the requirements for the first level – “Tier 1”. Then you can log in with your account for the first time. Click on “Login” and log in with your access data.
>> Buy Basic Attention Token on Litebit now* <<
Buy Basic Attention Token by SEPA, SOFORT or Credit Card
The actual purchase of the Basic Attention Token (BAT) on Litebit is really easy and quick. You simply click on the “Buy” tab in the upper menu and then select “Basic Attention Token” in the drop-down menu (step 1 in the picture).
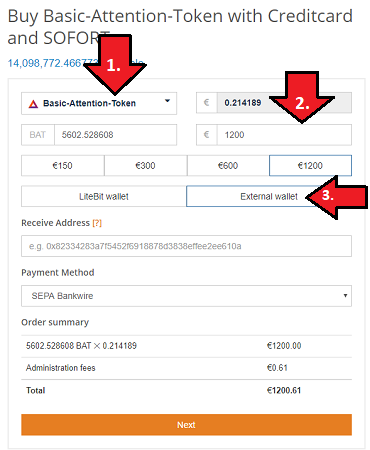
Below you can select the amount in Euro – either by entering it or by clicking one of the four buttons (step 2). Now you have to decide whether you want to use an external wallet or the Litebit Wallet. As explained at the beginning, an external wallet offers numerous advantages. If you have not yet set up a wallet, it is also possible to store the BAT on the Litebit first and then send it to your external wallet. There are no additional costs for this on balance. If you choose the Litebit Wallet, click on “Litebit Wallet”. Further down in the article you will find instructions for what we believe to be the best free Basic Attention Token Wallet.
If you want to use an external wallet, select “External wallet” and enter your BAT reception address (step 3 in the picture). The “Receive Address” is your BAT Wallet address. In the last step you only have to choose a payment method.
Our recommendation is “Sepa Bankwire” because it has the lowest fees (at the time of writing it was 0.61 EUR, regardless of the price). The bank transfer has the big disadvantage that it can take up to 24 hours. Meanwhile, the price of BAT can of course change significantly. However, Litebit also has a solution for this. You can buy Litebit Credits by bank transfer and exchange them for the Basic Attention Token within a few seconds. If you decide for SEPA, you have to transfer the corresponding amount in Euro, with a specific purpose, to the bank account of Litebit. After this it usually only takes up to 24 hours until Litebit has received the payment and sends the Basic Attention Token to your wallet.
>> Buy Basic Attention Token on Litebit now* <<
Buy Basic Attention Token on Bitpanda
The broker Bitpanda is one of the largest and best-known brokers in Europe and was founded in 2014. Unlike Litebit, the Broker is available worldwide. Bitpanda currently offers four Fiat currency wallets for US dollars, euros, Swiss francs and British pounds. Users can deposit money via the Fiat Wallets and then buy cryptocurrencies within a few seconds. This eliminates long settlement times for payment service providers, which are a barrier for investors due to the volatility of the market.
Other advantages of the broker are that the site is available in 3 languages: English, German and French is available (more are planned). In addition, Bitpanda is fully regulated under EU law due to its headquarters in Vienna. Accordingly, the platform can be classified as reputable and secure. Another advantage of the broker is that there are numerous payment options to choose from.
Setup & Verification
The registration at Bitpanda is unfortunately not so easy and fast compared to other platforms. However, setting up a verified account should not be an obstacle for you. The process is very well documented by Bitpanda. You can also use this article as a guide.
Step one is to go to the official website (click here!) and click on the “Get started now” button. You will then be asked to provide some personal information: your name, e-mail address, password and country of residence. You must also accept the terms and conditions and the privacy policy. Once you have entered all the data, you can click on “Create account” to submit the application for opening an account. You will now receive an e-mail with a confirmation link. Once you have verified your email address, you can log in to Bitpanda. Before you can buy cryptocurrencies, you must fully verify yourself.
According to the legal regulations in Austria and the European Union, all customers of the platform must fully identify and verify themselves. Trading in cryptocurrencies, such as the Basic Attention Token, will only be unlocked once you have fully verified yourself. Verification is performed using various video identification procedures. It is important that you have a stable internet connection and a webcam (you can also use your smartphone, if necessary). To start the process, click on “Verify now” on the dashboard of your account.

Some other personal data will then be requested: your full address, a telephone number and your date of birth. Besides, you have to confirm all the details. To perform the verification, Bitpanda offers two options: a “light verification” and a “full verification”: 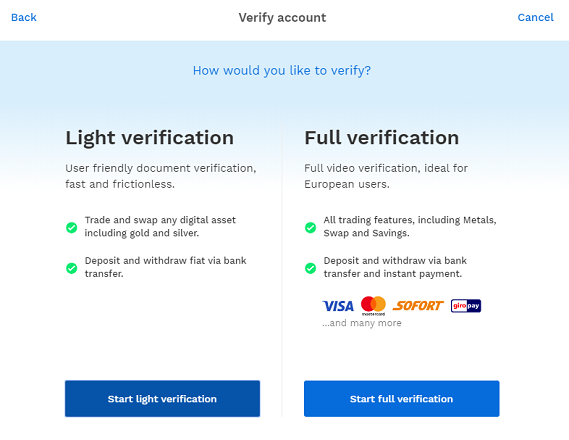
Light Verification
The Light Verification is a document-based verification. For this you have to scan your identity document with your webcam. This process is carried out by a Bitpanda partner company called eID. The Light Verification offers you the following possibilities:
- Deposit and withdrawal of Fiat currencies (only) by bank transfer
- Trading of cryptocurrencies as well as gold and silver
Full verification
Full verification allows you to use all features of the Bitpanda platform, including the Bitpanda Global Exchange. The verification is performed by the partner companies IdentityTM and IDNow.
We made a phone call via webcam for the verification. Here we were asked some questions and personal data were compared by means of the identity document. We also had to say that we wanted to trade cryptocurrencies of our own volition, despite the “risks” at Bitpanda. In total, the call did not last longer than 4-5 minutes.
Upon completion of full verification, a limit of 2,500 EUR will be available to you for deposits made using online payment methods such as EPS, GiroPay or SOFORT. The limit will be completely removed after you have made a verification deposit. You can do this by bank transfer, SOFORT or GiroPay /EPS. The amount must be at least 25 EUR and may not be higher than 2,500 EUR.
By the full verification you unlock the following functions:
- All features of Bitpanda, including swap and savings plan
- Deposit and withdrawal of Fiat currencies by bank transfer, credit card and various online payment service providers, such as SOFORT, iDEAL, Neteller, Skrill, Zimpler, etc.
- Trading on the Bitpanda Global Exchange
>> Buy Basic Attention Token now on Bitpanda* <<
Limits for the purchase of Basic Attention Token
The limits for deposits and withdrawals of Fiat currencies on Bitpanda vary depending on the verification status and payment method selected. The following table shows the limits for euro deposits:
| Not verified | Light Verification | Full verification | ||
|---|---|---|---|---|
| Bank transfer (SEPA) | Day (24h) | 0,00 EUR | 49.999,00 EUR | 49.999,00 EUR |
| Month | 0,00 EUR | 5.000.000,00 EUR | 5.000.000,00 EUR | |
| Total | 0,00 EUR | 100.000.000,00 EUR | 100.000.000,00 EUR | |
| Credit card | Day (24h) | 0,00 EUR | 0,00 EUR | 2.500,00 EUR |
| Month | 0,00 EUR | 0,00 EUR | 300.000,00 EUR | |
| Total | 0,00 EUR | 0,00 EUR | 5.000.000,00 EUR | |
| Online Payments | Day (24h) | 0,00 EUR | 0,00 EUR | 10.000,00 EUR |
| Month | 0,00 EUR | 0,00 EUR | 300.000,00 EUR | |
| Total | 0,00 EUR | 0,00 EUR | 10.000.000,00 EUR | |
| Payment method(s) | - | SEPA | EPS, GiroPay, SOFORT, Netelle, SEPA, Skrill, VISA, Mastercard, Zimpler, iDeal |
The next table shows the limits for USD deposits:
| Unverified | Light verification | Verified | ||
|---|---|---|---|---|
| Online Payments | Daily limits (24h) | USD 0.00 | USD 0.00 | USD 11,151.50 |
| Monthly limits | USD 0.00 | USD 0.00 | USD 334,545.13 | |
| Total limits | USD 0.00 | USD 0.00 | USD 11,151,504.34 | |
| Credit card | Daily limits (24h) | USD 0.00 | USD 0.00 | USD 2,787.88 |
| Monthly limits | USD 0.00 | USD 0.00 | USD 334,545.13 | |
| Total limits | USD 0.00 | USD 0.00 | USD 5,575,752.17 | |
| Payment options | - | - | Skrill, VISA, Mastercard |
Fees for the purchase of BAT
With regard to fees, you should keep in mind that all prices at Bitpanda are real-time prices. This means that all fees are included in the displayed price, which updates every 60 seconds. Consequently, you will receive from Bitpanda exactly the amount that will be displayed to you when you place your order. The fees for the purchase of Bitcoin are currently 1.49 percent and for the sale of 1.29 percent. The difference between the buy and sell price is known as the spread.
The table below gives you an overview of minimum deposit, withdrawal and fee amounts:
| No fees for deposits bigger than... | Deposit fees | Minimum deposit | Withdrawal fees | Minimum payout | |
|---|---|---|---|---|---|
| 0x | 10.00000000 ZRX | 0.20000000 ZRX | 2.00000000 ZRX | 0.09999940 ZRX | 2.00000000 ZRX |
| Augur | 1.00000000 REP | 0.01000000 REP | 0.10000000 REP | 0.01000040 REP | 0.10000000 REP |
| Basic Attention Token | 10.00000000 BAT | 0.50000000 BAT | 1.00000000 BAT | 0.23000000 BAT | 1.00000000 BAT |
| Bitcoin | 0.05000000 BTC | 0.00010000 BTC | 0.00100000 BTC | 0.00049910 BTC | 0.00150000 BTC |
| Bitcoin Cash | 0.01000000 BCH | 0.00010000 BCH | 0.00100000 BCH | 0.00002300 BCH | 0.05000000 BCH |
| Cardano | 100.00000000 ADA | 1.00000000 ADA | 10.00000000 ADA | 0.20000110 ADA | 1.00000000 ADA |
| Chainlink | 10.00000000 LINK | 0.50000000 LINK | 1.00000000 LINK | 0.09999940 LINK | 1.00000000 LINK |
| Dash | 0.10000000 DASH | 0.00010000 DASH | 0.01000000 DASH | 0.00000000 DASH | 0.01000000 DASH |
| EOS | 10.00000000 EOS | 0.00100000 EOS | 0.10000000 EOS | 0.00000000 EOS | 0.01000000 EOS |
| Ethereum | 0.10000000 ETH | 0.00050000 ETH | 0.00100000 ETH | 0.00138000 ETH | 0.02000000 ETH |
| IOTA | 10.00000000 MIOTA | 0.10000000 MIOTA | 0.50000000 MIOTA | 0.02000080 MIOTA | 1.00000000 MIOTA |
| Komodo | 10.00000000 KMD | 0.01000000 KMD | 0.10000000 KMD | 0.00000000 KMD | 0.10000000 KMD |
| Litecoin | 0.10000000 LTC | 0.00010000 LTC | 0.00100000 LTC | 0.00089700 LTC | 0.05000000 LTC |
| NEM | 100.00000000 XEM | 0.10000000 XEM | 1.00000000 XEM | 0.04999970 XEM | 0.10000000 XEM |
| NEO | 1.00000000 NEO | 0.00000000 NEO | 1.00000000 NEO | 0.00500020 NEO | 1.00000000 NEO |
| OmiseGo | 5.00000000 OMG | 0.20000000 OMG | 0.50000000 OMG | 0.09999940 OMG | 1.00000000 OMG |
| Pantos | 1000.00000000 PAN | 1.00000000 PAN | 5.00000000 PAN | 1.00000090 PAN | 5.00000000 PAN |
| Ripple | 0.10000000 XRP | 0.00000000 XRP | 0.10000000 XRP | 0.00000000 XRP | 1.00000000 XRP |
| Stellar | 10.00000000 XLM | 0.00000000 XLM | 0.10000000 XLM | 0.00000000 XLM | 10.00000000 XLM |
| Tether | 10.00000000 USDT | 0.25000000 USDT | 0.50000000 USDT | 0.09999940 USDT | 0.10000000 USDT |
| USD Coin | 10.00000000 USDC | 0.25000000 USDC | 0.50000000 USDC | 0.09999940 USDC | 0.10000000 USDC |
| Waves | 5.00000000 WAVES | 0.01000000 WAVES | 0.10000000 WAVES | 0.00000000 WAVES | 0.10000000 WAVES |
| ZCash | 0.05000000 ZEC | 0.00100000 ZEC | 0.00500000 ZEC | 0.00010120 ZEC | 0.00100000 ZEC |
If you deposit a fiat currency other than US Dollar, Euro, British Pound or Swiss Franc, additional exchange fees may apply. These are not collected by Bitpanda, but by the payment service provider, which is why they are not reported by Bitpanda. If you send cryptocurrencies internally at Bitpanda (e.g. to other Bitpanda users), there are no transaction fees.
Buy Basic Attention Token: How it works!
To buy Basic Attention Token (BAT) at Bitpanda you have to deposit your local currency at the Fiat-Wallet of Bitpanda. Then you can exchange your national currency for BAT. In detail you have to follow these steps:
- Click on the “Deposit” button in the upper right corner.

- Select the Fiat Wallet for your local currency.
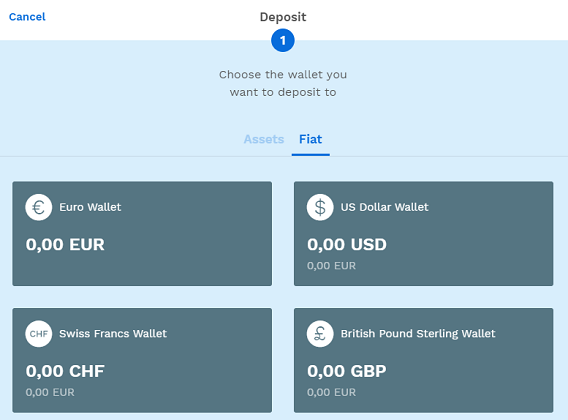
- Select your preferred payment method. These vary according to country and national currency.
- Enter the amount you would like to deposit at Bitpanda and click “Go to Summary”:
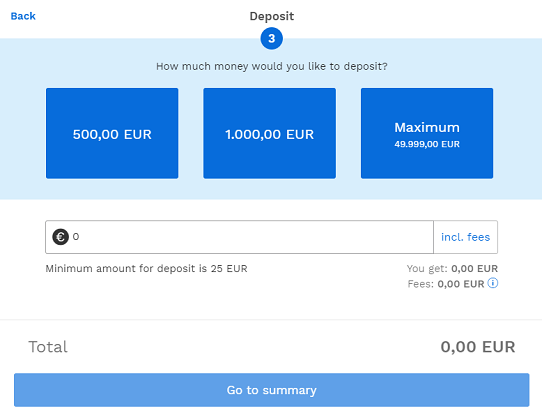
- In order to carry out the transaction, you must waive your right of withdrawal in step 5. You will also receive a PIN code via SMS (not for bank transfers), which you must enter on the website.
- In the next step you will be redirected to the website of the chosen payment service provider or you will see the details for the bank transfer. After graduation, you will be redirected to Bitpanda. Depending on the payment method, the amount will be credited to your Fiat Wallet faster or slower.
- As soon as the money has arrived on your Fiat Wallet, you can click on “Trade” in the upper right corner.

- Click on “Buy” and select Basic Attention Token (BAT) and your wallet – either the Bitpanda Wallet or an external wallet.
- Select the Fiat Wallet with which you wish to pay and set the purchase amount..
- In the last step you will see a summary of your order. Click on “Buy now” to complete the purchase.
Buy Basic Attention Token on Coinbase
Coinbase has more than 30 million customers in over 100 countries worldwide, making it the largest cryptocurrency broker in the world. The American exchange is one of the veterans of the crypto market. While in the beginning Coinbase was only a broker where you could buy Bitcoin, in the past years numerous features and services have been added.
For example, Coinbase offers the purchase and sale of cryptocurrencies by credit card, debit card and bank transfer. Coinbase has also had a mobile wallet service for iOS and Android since 2018. In addition to the brokerage platform, Coinbase users can also use the Coinbase Pro exchange. This is aimed at experienced investors. Coinbase Pro allows users to actively trade cryptocurrencies. There are also advanced options for trading.
The Coinbase Brokerage Service is particularly popular with beginners, as the broker is fully licensed in the USA and is compliant with American law. The company also offers deposit insurance for all customer deposits held online. Should Coinbase suffer a hack, the insurance policy would cover the lost customer funds.
>> Sign up on Coinbase now* <<
Approved countries – Is it legal to trade on Coinbase?
Coinbase is committed to working with regulators around the world to comply with the specific laws of each country. This means that not all persons worldwide are entitled to use the services of Coinbase. Depending on the country, individual cryptocurrencies may not be available because of legal uncertainties. Irrespective of this, the inhabitants of the following 103 countries are currently entitled to trade on Coinbase.
Payment methods and fees
Payment methods and fee structures vary from country to country. Basically the following payment methods are offered:
- Bank Transfer (including ACH in the USA and SEPA in the EU)
- credit card
- debit card
- PayPal (payout only)
The exchange rate of Coinbase is determined by adding a margin or spread to the market rate of Coinbase Pro (“Pro Exchange Rate”). Coinbase also charges additional fees depending on the payment method. The fee structure is as follows:
- There are no fees for bank transfers.
- A fee of 3.99 percent of the transaction amount is charged for credit card payments.
- A fee of 1.49 percent of the transaction amount is charged for purchases made with Coinbase credit.
- A flat fee of 0.15 Euro will be charged for payment / transfer from Coinbase to a bank account.
- Transactions between Coinbase accounts are free of charge.
Coinbase also charges a fee for purchases of smaller amounts. If the transaction amount …
- is less than or equal to 10 USD, the fee is 0.99 USD.
- is between 10 and 25 USD, the fee is 1.49 USD.
- is between 25 and 50 USD, the fee is 1.99 USD.
- is between 50 and 200 USD, the fee is 2.99 USD.
Depending on the country, not all payment methods are permitted. The following table gives European customers an overview (“Buy” = buy crypto directly, “Sell” = sell crypto directly, “Deposit” = pay in local currencies and “Withdrawal” = pay out local currencies) which payment methods can be used to trade on Coinbase:
| Provider | Buy | Sell | Deposit | Withdraw | Speed |
|---|---|---|---|---|---|
| SEPA | ❌ | ❌ | ✅ | ✅ | 1-3 business days |
| 3D Secure Card | ✅ | ❌ | ❌ | ❌ | Instant |
| Ideal/Sofort | ❌ | ❌ | ✅ | ❌ | 3-5 business days |
What are the limits on Coinbase?
Basically, there is no general and official statement about how high the limits are. In comparison to other exchanges and brokers, Coinbase sets the limits for the purchase of basic attention tokens and other cryptocurrencies individually for each user. In general, the limits on coinbase can be divided into two levels. Level 1 requires you to provide proof of your telephone number and ID. To reach level 2, you must verify your complete personal information.
In addition, the limit depends on these factors:
- payment method
- Age of your account
- History of previous purchases
On the Internet you will find numerous reports in which users write about their limits. There seems to be a consensus that the initial limit is EUR 500 per week for credit card payments and EUR 1,000 per week for bank transfers. If you verify with one document, the limit rises to 9,000 euros, while for two documents it is 15,000 euros. However, the above values should only be used as a guide. You can see your personal limit in your Coinbase account.
>> Buy Basic Attention Token on Coinbase* <<
Buy Basic Attention Token by bank transfer or credit card
The process for registering with Coinbase is very simple and straightforward. To get started, you must first visit the official Coinbase website (click here!)*.
You will then be asked to enter your name, email address and password. You will need to verify your email address via a confirmation link that will be sent to your previously provided email address. Coinbase would also like to know your telephone number. You also have to verify this with a PIN code, which is sent to you by SMS.
In addition, Coinbase requests the following information: your date of birth, your full address, your occupation, the name of your employer, the origin of your funds, your investment experience, etc. Coinbase must also fully verify your identity, i.e. all other personal data, in accordance with the Know Your Customer laws required worldwide. Once you have completed verification, you can purchase Basic Attention Tokens. This works in the following sub-steps:
- Click on the “Trade” button at the top right of the buy page.
- Then the following window opens (see screenshot). Here you can select “Buy Basic Attention Token” and enter the amount in your local currency:

- If you have selected “Basic Attention Token”, you can click on “Pay” below. Here you can select the payment method. If you have already deposited a credit card, you will see the following window (see screenshot). You have the option to select your existing credit card or to add a new, different payment method (e.g. bank transfer). The purchase limit depending on this will be displayed in a separate window.
- If all details are complete, you can click on “Buy”. The Basic Attention Token will be credited to your Coinbase account within seconds.
>> Buy BAT on Coinbase now* <<
Buy Basic Attention Token on Binance
Binance is one of the world’s largest and most popular platforms for trading cryptocurrencies. In contrast to the brokers presented above, however, there is a significant difference. Binance is an exchange specialized in trading (like Coinbase Pro). The direct purchase of cryptocurrencies is strongly limited. Currently, Binance only offers the purchase of Bitcoin, Bitcoin Cash, XRP, Ethereum, Binance Coin and Litecoin by credit card.
Accordingly, you can only purchase the Basic Attention Token via a detour on Binance. You can buy another of the above cryptocurrencies by credit card and then exchange it for a Basic Attention Token (BAT). Alternatively, you can of course buy the other cryptocurrencies from a broker such as Litebit or Coinbase and then trade BAT on Binance.
As usual, the first step is to create an account with Binance. To do this, you must click on this link (Binance.com) and first set up an account*. Registration with Binance is completed very quickly, as there is no need to verify any personal data (e.g. identity card, proof of residence). Unlike other exchanges, Binance allows you to trade up to a daily limit of 2 bit coins without verification. However, if you are aiming for a higher limit, you will need to perform a verification. This increases your limit to 100 BTC per day.
Step 1: Buy Bitcoin by credit card
As soon as you have completed the registration, you must first buy a cryptocurrency on Binance, which you want to exchange later for a Basic Attention Token (BAT). On Binance you can exchange BAT for BTC, ETH, BNB or Tether (as of August 2019). We will show you the process using Bitcoin as an example: First you have to click on “Medium” and “Buy with Credit Card” in the menu. After that you will see the following overview. Here you can select “BTC” and enter the purchase amount.
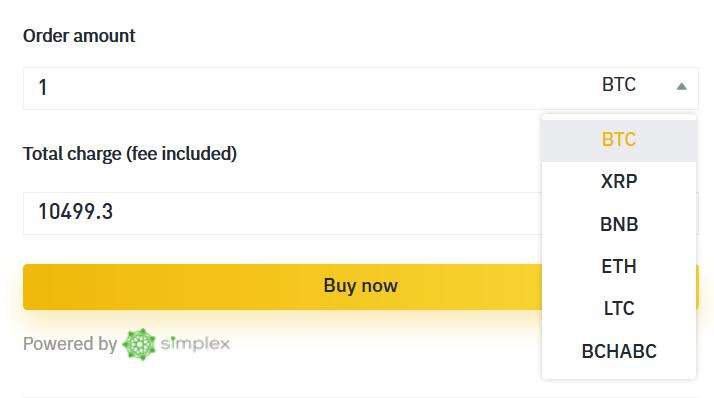
Binance cooperates with the third-party provider “Simplex” to process the purchase. Therefore a verification of your identity is necessary! The purchase process is quite simple. In the following we have briefly summarised the individual steps:
- Select “BTC” and your local currency with which you would like to pay.
- Fill in the fields with the personal data.
- Verify your email and phone number using the code sent to you.
- Go back to the website and click “Next” .
- Enter your credit card details.
- Upload your documents to verify your identity (front and back of your passport).
Before and after the purchase there are some things to keep in mind:
- The Bitcoin amount you enter in the purchase process is based on the current price and is not final. Instead, it will be calculated later! If the exchange rate changes by more than +/-2.5%, you will be asked to confirm the transaction again.
- After completing the payment you can check the status of your payment on Simplex.
- The Simplex fee is 3.5% per transaction or USD 10, whichever is higher.
- The daily limit is 20,000 USD. The monthly limit is 50,000 USD.
- The minimum amount for a transaction is currently USD 50.
>> Buy Bitcoin on Binance now* <<
Step 2: Send Bitcoin to Binance
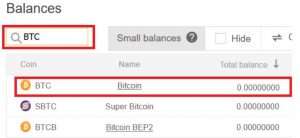
Step 2 is optional: If you own Bitcoin on another wallet or would like to buy from another broker, you must transfer the BTC to Binance. To do this, you need the Bitcoin receiving address of the Binance Wallet. You can find the “Receive Address” in the navigation under “Funds” and “Deposit“. You can then enter BTC in the search field and select Bitcoin.
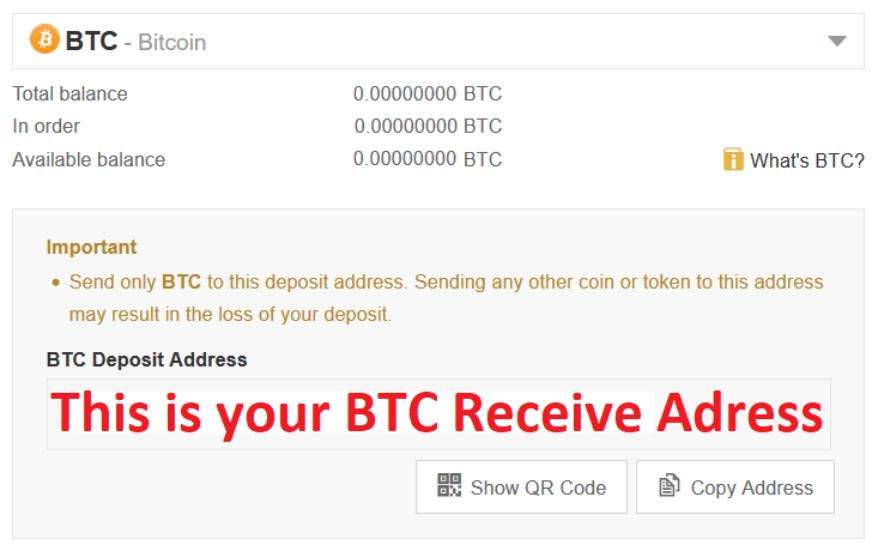
Your Bitcoin address of the Binance Wallet will now be displayed. You can enter these in the purchase process with the various brokers in order to send the BTC directly to Binance.
Step 3: Trade Basic Attention Token
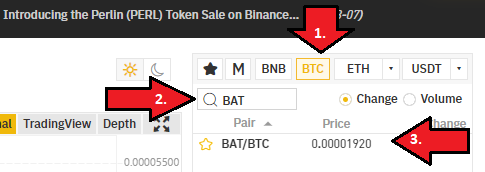
As soon as the Bitcoins have arrived on Binance, you can start the trade. To do this, click on the menu item “Exchange” in the upper left-hand corner of the Binance logo and then “Basic“. Afterwards you will see the following overview (see screenshot below). Now you have to make sure that BTC is set as trading pair (step 1). In the search field below (step 2) enter “BAT” and click on BAT/BTC (step 3).
The display below the price chart then changes. If you have any problems or open questions, we recommend that you read our Binance Review, in which we provide a more detailed explanation of Binance’s trading overview. If you were able to follow the previous steps, you now have to choose between a “Limit”, “Market” and “Stop-Limit” order.
>> Buy Basic Attention on Binance* <<
Step 4: Select Limit, Market or Stop-Limit Order
A “limit“ order is placed in the order book at a limit price you specify. This means that the order is only executed when the market price reaches the limit price. However, if the market price does not reach the price you set, the limit order remains open. You can delete them at any time. A “limit” order should always be used if you are not in a hurry to buy or sell, or if you want to achieve a certain price.
However, a “market“ order is executed within a few seconds at the current market price (see step no. 4 in the screenshot below). Therefore, the “Market” order is particularly suitable for beginners and investors who want to sell or buy quickly. Since you want to sell Bitcoin and get BAT for it, you need to use the left side of the view. In the line “Amount” you enter how much Basic Attention Token you want to buy. When you have entered everything, you can click on “Buy BAT”.

The BATs will then be visible on the Basic Attention Token Binance Wallet within a few seconds. Since the Binance Wallet is an online wallet, we recommend that you send the BAT to a secure wallet. Hardware Wallets offer you the best possible protection. We have tested the most popular hardware wallets and show you in our hardware wallet comparison which model is the best. If you don’t want to spend money on a hardware wallet, we will introduce you to the best free BAT wallet below.
The best free Basic Attention Token Wallet
When it comes to managing Ethereum-based tokens (ERC20), the MyEtherWallet is the de facto standard. There is also the official Brave Wallet as extension for the Brave Browser. For reasons of practicality – with the MyEtherWallet all ERC20 tokens can be managed – this is our tip for the storage of Basic Attention Tokens.
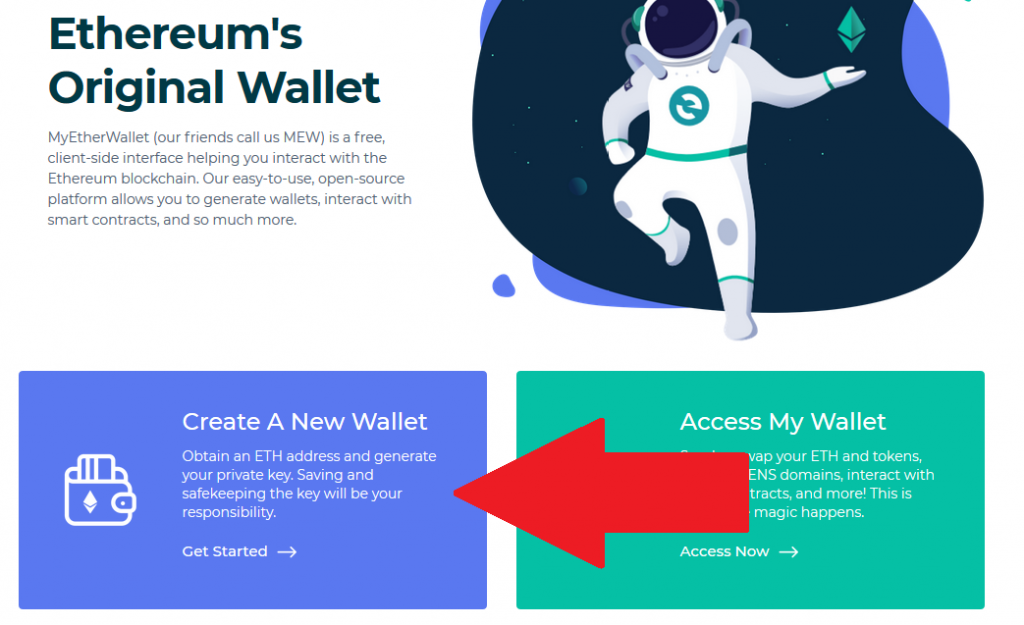
To install it, you must first go to the official site and download the wallet. If you click on this link (click!) you will get to the website where you can download the wallet. Simply click on the “Create A New Wallet” button on the MyEtherWallet homepage.
Before we start, a teaching appears about what the MyEtherWallet is at all. Just click through the hints with “Next”. Below we have summarized the most important points:
- The MyEtherWallet (MEW) is a free, open source client interface that allows users to interact directly with the Ethereum blockchain while maintaining full control over their keys and funds. (MEW does not store the Private Keys, such as a stock exchange)
- This means that MEW cannot access accounts, recover keys, reset passwords or reverse transactions. If the access data is lost, it is lost forever.
- Therefore it is extremely important to keep the keys and passwords safe (on paper, not on the computer or phone).
After you have clicked through all the hints, you will be taken to the following page:
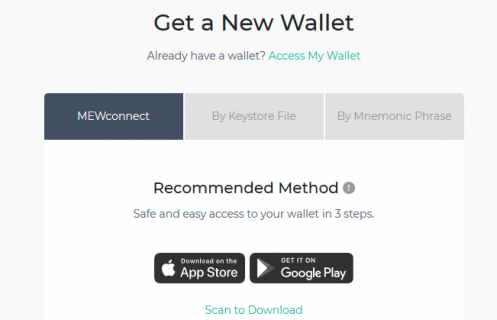
MyEtherWallet (MEW) offers three possibilities to create a new ETH-Wallet. These are:
- MEWconnect
- via keystore file or
- by mnemonic phrase.
From the three possibilities we recommend to install the Wallet via Smartphone-App (MEWconnect). The following video offers a simple (albeit English-language) manual for downloading and setting up the app. As we have already written, it is important to write your password and private key on a piece of paper and keep it safe!
After you have completed the installation, we recommend that you make a backup. This is intended in case you lose your password or replace your smartphone. The backup allows you to gain access to your Basic Attention Token Wallet via the backup phrase. On the start screen of the smartphone app you should see a button “BACK UP” (see screenshot). Click the button:
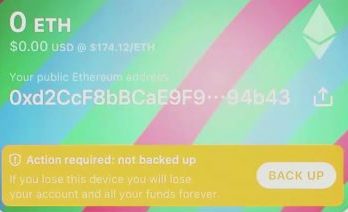
You will then see the “Recovery Phrase” that you need to recover the wallet. Write these 24 words on a piece of paper that you keep safe in a safe.
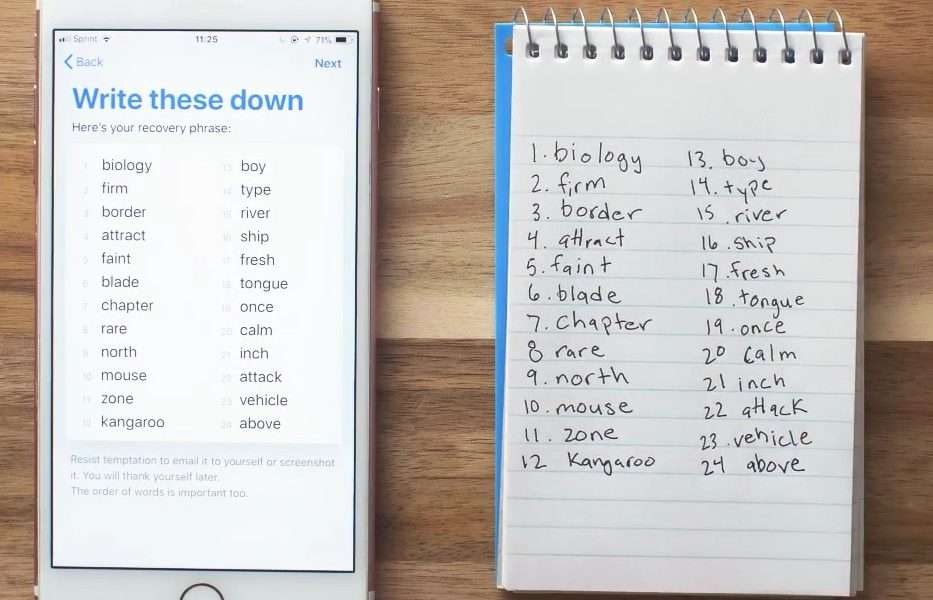
Source: https://kb.myetherwallet.com/posts/mewconnect/mewconnect-101-recover/
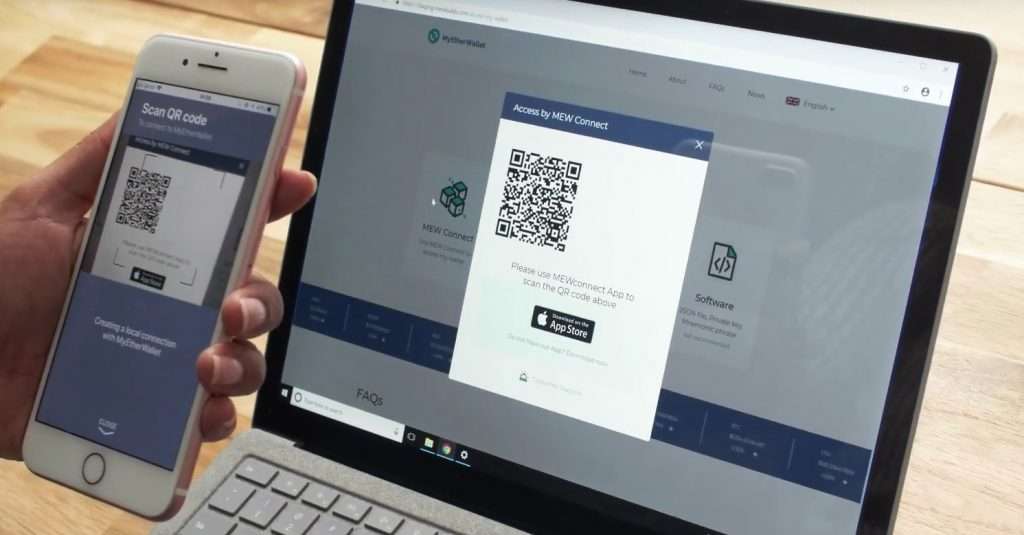
To connect your MyEtherWallet to the blockchain, you must now go back to the myetherwallet.com website. On the start page you will find the button “Access My Wallet” next to the blue button “Create A New Wallet”. Click on it and you will be taken to the following page where you can connect to “MEWConnect”.
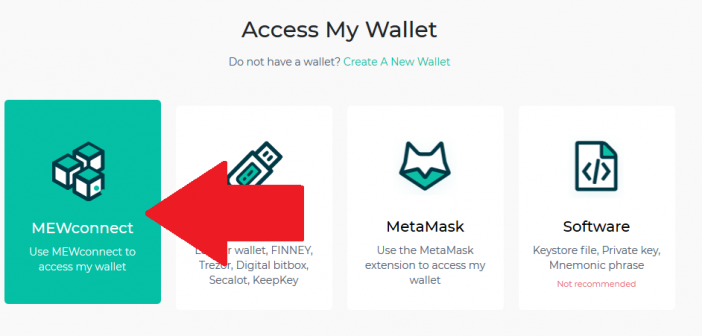
Then you will be asked to scan a barcode with your MEW App to connect to the Basic Attention Token Wallet. If you are still logged in, you will see a blue button “Scan to connect” on the start page of the app. If you press this button, you can scan the barcode on the screen of your computer.
Source: https://mewconnect.myetherwallet.com/#/tutorial-videos
Now you are successfully connected to your MyEtherWallet and can check your account balance, send and receive transactions. Under the menu item “Send” you can select the amount (“Amount”) of Basic Attention Token and the destination address (“To Address”).
Subscribe to our daily newsletter!
No spam, no lies, only insights. You can unsubscribe at any time.
If you liked this guide, please give us a positive review:
[ratings]


