In this article we introduce to you several ways in which you can buy IOTA very easily, quickly and safely and how you can store IOTA safely afterwards. But before you read through the individual instructions for the various exchanges and brokers, you should make an important decision in advance. According to your decision, you will receive a recommendation for the purchase of IOTA from us.
If you would like to check the current IOTA price first, we recommend our IOTA price overview.
Guide: Choosing the best exchange or broker
Do you want to keep the IOTA yourself and thus have full control over your property, the cryptocurrency or are you looking for a simple solution and delegate the responsibility of management to a broker? Then you also have the opportunity to invest in IOTA CFDs.
You should know the following when answering this important question: The basic idea of cryptocurrencies like IOTA is to create a financial system without third parties and middlemen (e.g. banks, credit institutions). From our point of view it is therefore generally more desirable to manage the IOTA yourself, since only you have access to your asset via your private key. Cryptocurrency exchanges and brokers have the big disadvantage that they keep the private key for you. So you give up control of your asset. However, this is not the only disadvantage. In the past, exchanges and brokers have been victims of hacker attacks, with large amounts of cryptocurrencies being stolen. In this respect, we believe it is safer to manage your IOTA yourself. However, it can be complicated for beginners to set up and use a desktop or hardware wallet.
Another special third solution is cryptocurrency CFDs. Very important to know with CFDs is however that you do not own the cryptocurrency, like IOTA, but only hold the certificate (CFD) on a rising (Long) or falling (Short) price. On the basis of these preliminary considerations, we would like to make the following recommendations:
- If you want to manage IOTA yourself, we recommend Kriptomat, where you can buy IOTA using the euro (SEPA, Credit Card, Neteller, Zimpler). Afterwards you can send the IOTA to your desktop or hardware wallet.
- If you want to invest in IOTA but are looking for a quick and easy solution because you don’t want to deal with the technical details (and therefore don’t want control over the private key), you should buy IOTA from eToro.
- If you want to speculate on a rising or falling IOTA price with leverage, IOTA CFDs may be the right choice for you. We recommend that you use eToro or Plus500** as established and well-known brokers.
**Risk Warning: 80.6% of retail CFD accounts lose money.
✅ Deposit insurance on capital invested
✅ Trading with a leverage
✅ No wallet setup required
❌ no possession of a real cryptocurrency
❌ Cannot be used as a means of payment in everyday life
✅ Freedom and independence from third parties (exchanges, brokers)
✅ Lower fees for long-term investors
✅ No obligation to make additional contributions (only total loss possible)
❌ More time required to set up the external wallet
❌ Responsibility for the Private Key & no deposit insurance
**68% of retail investor accounts lose money when trading CFDs with this provider. You should consider whether you can afford to take the high risk of losing your money.
Cryptoasset investing is unregulated in some EU countries and the UK. No consumer protection. Your capital is at risk.
Below are the instructions for Kriptomat, Coinmerce as well as eToro and Plus500. We will also show you how you can trade IOTA with Bitcoin (BTC), Ethereum (ETH), Binance Coin (BNB) and other cryptocurrencies on the popular exchange Binance.
Buy IOTA on eToro
Another reliable retailer to buy IOTA is from our experience eToro. The first step is to go to the official website etoro.com (click on this link!)**. Then click on the green button “Register now”. Then a new window will open where you have to enter your first and last name, e-mail, password, telephone number and a user name.
**= 75% of retail investor accounts lose money when trading CFDs with this provider. You should consider whether you can afford to take the high risk of losing your money.
Cryptoassets are highly volatile unregulated investment products. No EU investor protection.
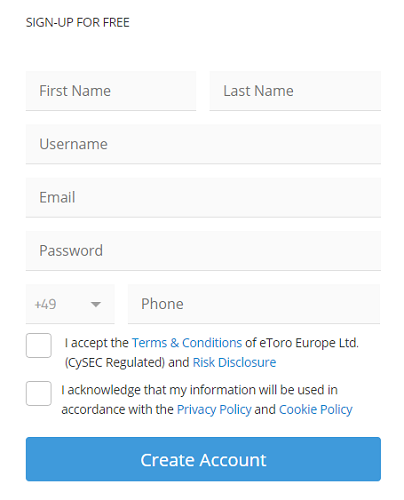
Once you have successfully done this, you will also need to accept the Terms of Use and Privacy Policy. Then you can click on the blue button “Create account”.
>> Start trading on eToro** <<
**68% of retail investor accounts lose money when trading CFDs with this provider. You should consider whether you can afford to take the high risk of losing your money.
Cryptoasset investing is unregulated in some EU countries and the UK. No consumer protection. Your capital is at risk.
Limits for the purchase of IOTA from eToro
Once you have successfully completed these steps, you will automatically be logged into your account. Your current account is subject to certain deposit limits as you have not yet fully verified your identity. This means that the initial deposit limit is 2,000 euros.
Below you will find an overview of all payment options that depend on your place of residence and their limits.
Payment method Country Time to credit Maximum amount per transaction
In order to use the full functionality of eToro, you need to prove your identity and address, as well as a tax number. This process is necessary in connection with the strict provisions of EU law and is already an integral part of the secure operation of the platforms on many other exchanges. Verification is completely free and can be done in a few simple steps. Click on the “Edit” button on your profile. There the necessary documents are listed, which have to be submitted in order to activate the full range of functions.
Now you can deposit money. All you have to do is select “Deposit money” in the lower left corner and then enter your preferred payment method. Depending on the type of deposit (see table above), the credit will be either slightly faster or slower. Now you can go directly to purchasing IOTA.
Buy IOTA at eToro
As already described in the introduction, eToro has the special feature that the platform is both an exchange and a broker. This means that both “real” IOTA and IOTA CFDs can be purchased.
In contrast, all buy positions with leverage are executed as CFDs. CFDs are so-called derivatives – a security whose value or performance depends on the performance of one or more underlying assets. They are specialized and popular over-the-counter (OTC) financial products that allow traders to easily open positions in a variety of different financial markets. The underlying asset – IOTA – is not acquired by the investor. All you receive is a certificate.
Buy “real” IOTA
EToro currently offers 15 different cryptocurrencies for trading, including IOTA. To buy “real” IOTA, you have to click on “Trade Markets” and then on “Crypto” and then on IOTA. The following overview is then relatively self-explanatory.

The letter “B” stands for buy IOTA and “S” for sell IOTA. Click on the “B” in the IOTA line to start the purchase. Then you only have to enter the amount of IOTA you want to buy. Then click on “Buy” (without changing any other setting) and your transaction will be executed within a few seconds. Now you have already bought IOTA easily and quickly. The IOTA are now stored on your eToro account / wallet.
Buy IOTA CFDs
The purchase of IOTA CFDs on eToro is very similar to the “real” purchase of the cryptocurrency IOTA. To buy IOTA CFD, you have to click on “B” to buy IOTA again. After that you get to the usual overview.
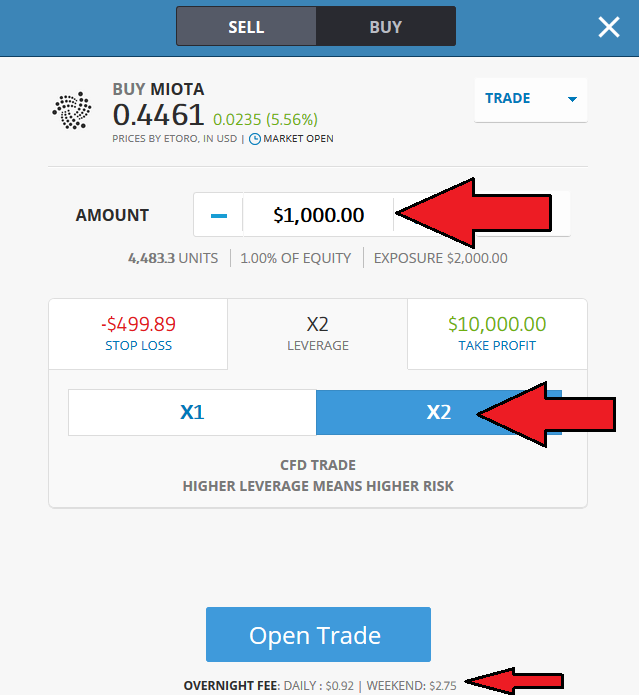
Here you set the amount of money you want to invest in this trade as usual. Afterwards you have to adjust the leverage multiplier “X2”. (For cryptocurrencies, eToro currently doesn’t offer a bigger leverage.) Then you should check your stop loss and take profit settings. A stop-loss limit is very important to limit the possible risk. Then you can open the trade. This is executed immediately when the market is open.
Stop Loss means that you close a trade if the IOTA price reaches a fixed market price or an amount of money that you can set. Take Profit determines when your trade is automatically closed when the profit of your trade reaches the amount you have chosen. It is also important to know that overnight fees (also called rollover fees) are charged by eToro. These will appear in the pop-up window before you place your order (see screenshot).
>> Buy and sell IOTA CFDs on eToro** <<
**68% of retail investor accounts lose money when trading CFDs with this provider. You should consider whether you can afford to take the high risk of losing your money.
Cryptoasset investing is unregulated in some EU countries and the UK. No consumer protection. Your capital is at risk.
The eToro Wallet
Since March 2019 eToro offers the possibility to manage single cryptocurrencies – Bitcoin, Bitcoin Cash, Ethereum, Litecoin and XRP – on a mobile wallet (an app). The app makes it possible to withdraw your own “real” cryptocurrencies from the exchange and send them to an external wallet.
Unfortunately, IOTA cannot yet be managed via the eToro Wallet (as of June 2019). So you are forced to keep the IOTA on eToro. As soon as there is news that IOTA can be transferred to the eToro Mobil Wallet, we will inform you!
Minimum Deposits and Processing Fees
When trading on eToro, you need to be aware of the following:
- All trading accounts are in US dollars (and not euros). That’s why your deposit will be converted into US dollars immediately. This is done at the current exchange rate, but please note that there is a conversion fee.
- The minimum deposit for all deposits other than the first deposit has to be at least USD 50. A minimum of 500 USD is required for deposits made by bank transfer.
- A withdrawal handling fee will be charged for withdrawals. You will see the respective withdrawal fee in the cashier area after you have entered the withdrawal amount. For payouts greater than 50 USD, this is 5 USD.
Is eToro safe and recommendable?
From our point of view, this question is very important because the management of private keys is delegated to a broker. The user gives the control over his own assets to a third party, here: eToro! This makes it all the more important that the broker is reputable and trustworthy.
From our point of view, this is clearly the case with eToro. As a rule, customer deposits are always well secured when the respective broker is supervised by a regulatory authority. EToro is immediately controlled by supervisory authorities that are considered very accurate and strict in flare trips:
- CySEC: As eToro has part of its registered office in Cyprus, the Cypriot CySEC is responsible for monitoring.
- FCA: As eToro has also established a subsidiary in the UK, FCA in the UK is also responsible for the control of eToro.
The broker also actively protects customer deposits by keeping them separate from the company’s assets. Even if the broker were to become insolvent, the customer’s money would not flow into the insolvency estate.
>> Buy and sell IOTA on eToro** <<
**68% of retail investor accounts lose money when trading CFDs with this provider. You should consider whether you can afford to take the high risk of losing your money.
Cryptoasset investing is unregulated in some EU countries and the UK. No consumer protection. Your capital is at risk.
eToro is a multi-asset platform which offers both investing in stocks and cryptoassets, as well as trading CFDs.
Please note that CFDs are complex instruments and come with a high risk of losing money rapidly due to leverage. 68% of retail investor accounts lose money when trading CFDs with this provider. You should consider whether you understand how CFDs work, and whether you can afford to take the high risk of losing your money.
Past performance is not an indication of future results. Trading history presented is less than 5 complete years and may not suffice as basis for investment decision.
Copy trading is a portfolio management service, provided by eToro (Europe) Ltd., which is authorised and regulated by the Cyprus Securities and Exchange Commission.
Cryptoassets are volatile instruments which can fluctuate widely in a very short timeframe and therefore are not appropriate for all investors. Other than via CFDs, trading cryptoassets is unregulated and therefore is not supervised by any EU regulatory framework.
eToro USA LLC does not offer CFDs and makes no representation and assumes no liability as to the accuracy or completeness of the content of this publication, which has been prepared by our partner utilizing publicly available non-entity specific information about eToro.
Buy IOTA on Kriptomat
About Kriptomat
Although Kriptomat is still a comparatively young crypto exchange, there are very good reasons why the exchange is our second choice for buying IOTA. The platform currently offers over 30 cryptocurrencies for purchase via SEPA bank transfer, credit card or Neteller. In line with the exchange’s motto “Crypto for everyone”, the focus is on a simple and modern user interface to enable really everyone, regardless of experience level, to buy IOTA. In our opinion this has been very successful!
However, this is not to say that Kriptomat is only recommended for beginners. In our opinion, there are good reasons for experienced investors to use the website. As far as seriousness is concerned, Kriptomat has two licenses issued by the government in Estonia. But this is certainly not the main argument for using Kriptomat. The main one is the low fees. Kriptomat does not charge a surcharge, the so-called “spread”, which is only visible on other exchanges by comparing it with the current spot price of IOTA. There is only a transaction fee, which depends on the payment method:
| Transaction | Fee % | Minimum |
|---|---|---|
| SEPA (Euro to crypto) | 1.45% | 1,45 EUR |
| Zimpler | 2,89 % | |
| Skrill | variable | |
| Neteller | variable | |
| SEPA sell (crypto to Euro) | 1,45% | 1,45 EUR |
| Credit card >100 EUR | 3,65 % | |
| Credit card <100 EUR | variable |
Registration and verification with Kriptomat
Kriptomat is a serious crypto exchange, which therefore complies very closely with the legal requirements of the European Union and requires extensive verification of its customers (to the same extent as eToro). To buy IOTA on Kriptomat, you need to create an account and have it fully verified before your first purchase. To do so, go to the official website kriptomat.io* and click on the orange “Register” button. A pop-up window will open where you can enter your first and last name, an email address and a password.
Kriptomat will then send you an e-mail containing an activation link for your account. Once you have clicked on the link, you can log in to your Kriptomat account using the access data you just provided. The registration process includes a few more steps. First you have to enter and verify your phone number. Kriptomat will send you an SMS containing a verification code that you enter on the website.
Due to the strict EU money laundering regulations, you will also have to disclose your full identity (address, identification document, proof of address, etc.) To start the process, simply click on the appropriate prompt (see screenshot).

After clicking on it, a new pop-up will open, in which you first have to enter your address (street, house number, city, country). It is also necessary that you upload a photo or scan of your passport or ID card. Kriptomat offers a very fast solution for this. You can continue the registration process on your smartphone.
Just click on the link and Kriptomat will send you an SMS with an individual link to continue the registration process. This way you can easily take a photo of your ID (front and back) and upload it directly. The same applies to the last step, a selfie of yours.
If you want to buy cryptocurrencies via SEPA Bank Transfer, there is also a fourth, final step that you should take, since SEPA Bank Transfer has the lowest transaction fee. To use SEPA for deposits, you need to add a bank account to your Kriptomat account. You can then deposit money via SEPA and then use your “credit” to buy IOTA and other cryptocurrencies. If you use Neteller, Skrill or your credit card, this is not necessary.
Once you have completed the registration process described above, these purchase limits will be available to you:
| Transaction | Limits |
|---|---|
| Daily deposit and withdrawal via SEPA | 25,000.00 EUR |
| Monthly deposit and withdrawal via SEPA | 200,000.00 EUR |
| Deposit and withdrawal in cryptocurrencies | no limit |
| Daily limit for other payment methods | 500.00 EUR |
| Monthly limit for other payment methods | 5,000.00 EUR |
As you can see in the table, you need to deposit via SEPA in order to buy larger amounts (> 500 euros per day) and benefit from the lowest fees. However, to make a SEPA transfer, you have to prove that the bank account belongs to you. Only then can you deposit money via SEPA and use this “credit” to buy IOTA. The following tutorial by Kriptomat provides a good overview of the entire verification process:
Buy IOTA (MIOTA) on Kriptomat
Once you have mastered the extensive registration and verification process, the actual purchase process of IOTA (MIOTA) is a breeze. When you are on your account overview page, click on the tab “Buy/Sell” (step 1) and then select the tab “Buy” (step 2). Then you can select IOTA (MIOTA).
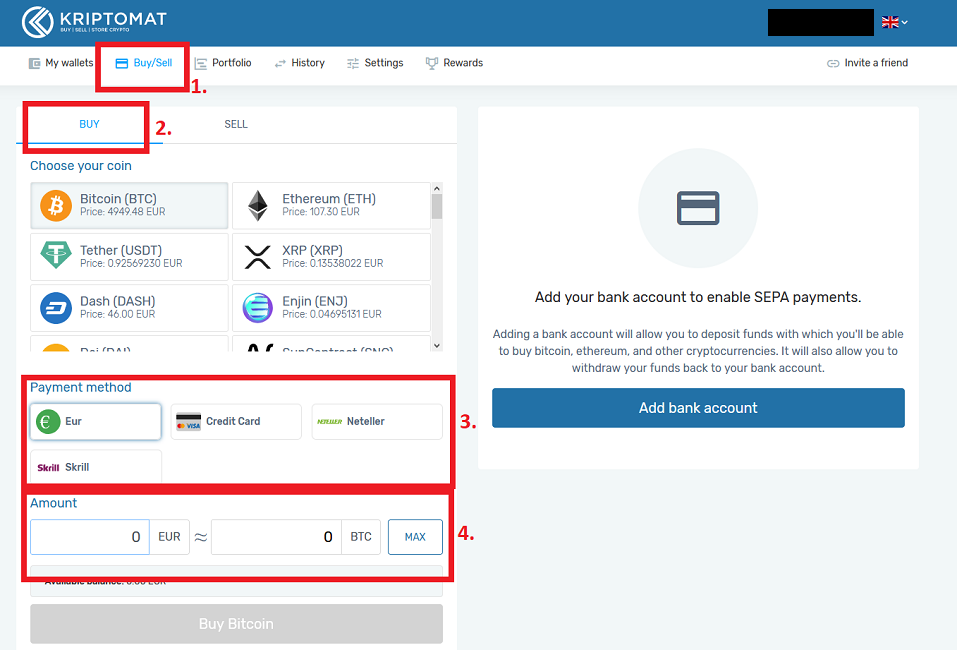
Then you can choose between four different payment methods (step 3). As described above, SEPA offers the lowest fees and allows you to buy amounts larger than 500 Euro. The only drawback is that it takes longer to deposit than credit card, Neteller or Skrill, which allow you to buy immediately without waiting.
In the fourth step (see screenshot) you just enter your purchase amount in Euro for the IOTA (MIOTA) and click on “Buy IOTA”. Afterwards you will get to a final overview where you can check the transaction fees that are charged for the order and, if everything is correct, finally complete the purchase by clicking on “Confirm transaction”.
Kriptomat will then redirect you to your “My Wallet” section. Your purchased IOTA will be displayed here, usually within a few seconds after the purchase. A good summary of the buying process is also provided in the following video tutorial:
Buy IOTA on Coinmerce
Guide: Buy IOTA fast and easy on coinmerce.io
The Dutch based cryptocurrency exchange Coinmerce.io is a still young exchange, which was founded in 2017, but has grown very fast and is enjoying increasing popularity. Coinmerce was founded by cryptocurrency enthusiasts to make buying and selling cryptocurrencies as easy and quick as possible for everyone. The all-in-one smartphone app from Coinmerce for iOS and Android is also available under this motto in the App Store and the Google Play Store. In order to make it as easy as possible for customers, Coinmerce also offers a wallet where the cryptocurrencies purchased can be stored.
The following video of Coinmerce offers a good overview of all features of the exchange:
In order to buy IOTA, you have to create a new account. Go to the homepage of coinmerce.io (click here!*) and click the red “Create account” button. You have to enter your personal information correctly afterwards. Thereby you have to make sure that this data matches with the data on your identity document required for a Level 2 account. You will be asked to enter your name, e-mail address, gender, nationality, date of birth, e-mail address and telephone number. After you have also entered a password, you can click “Register”. You will then receive a message that a verification link has been sent to you by e-mail.
You have to confirm this link via the received e-mail. You can then register with Coinmerce for the first time. As you will carry out Fiat money transactions on your account, Coinmerce is legally obliged to request in advance some data necessary for the Know Your Customer process (to implement the European Union Directive on Anti-Money Laundering and Anti-Terror Financing).
>> Register on Coinmerce now* <<
Verification and limits for the purchase of IOTA
With Coinmerce, there are different levels of verification and associated limits on how much you can trade daily, weekly or monthly.
- Level 1 (bank verification)
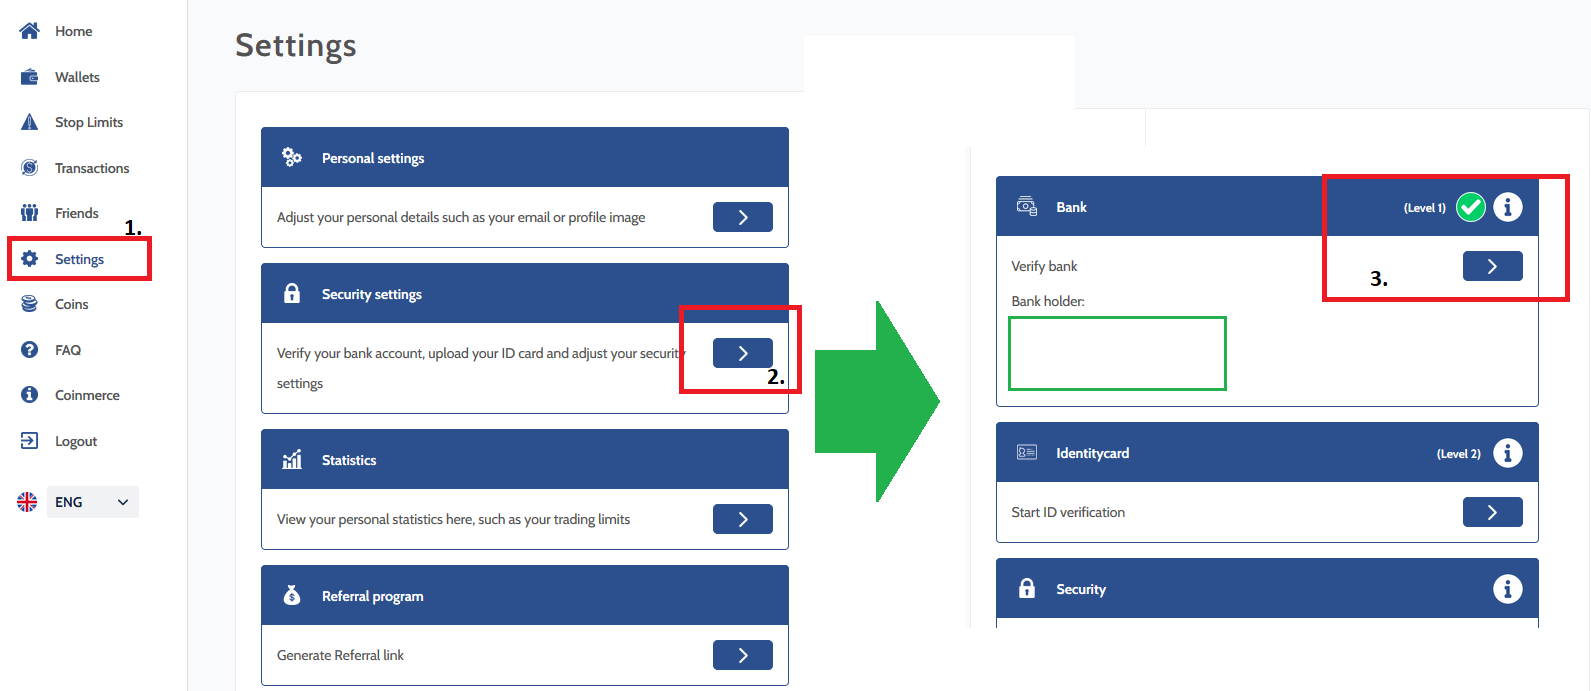
For level 1 you need to verify your bank account. This is mandatory for the purchase and sale of cryptocurrencies at Coinmerce. You can verify your bank account with iDeal or Sepa. You can do this via “Settings” -> “Security settings” -> “Bank“:
- Level 2 (identity check)
For Level 2 you will need to upload a valid ID card such as ID card, passport or driver’s license to Coinmerce. With a Level 2 account you can trade up to € 20,000 per day and € 60,000 per week.
- Level 3 (contact support)
If the aforementioned limits are not sufficient for you, you can apply for Level 3. Coinmerce requires proof of your source of funds, proof of residence and a Skype call. To request Level 3, you have to contact the Coinmerce customer support team. The table below provides an overview of the verification levels, processing times, transaction fees by payment method, and limits by level:
As you may have noticed, there is a Coinmerce Coin. This one is special. The Coinmerce Coin is always worth 1 Euro. The coin will give you the opportunity to secure your return if you want to actively trade and cash out. In addition, transactions with the Coinmerce Coin are completely free of charge. There are no transaction fees for the purchase when using the Coinmerce Coin. In addition, the transaction time will also be shortened.
Buy IOTA by SEPA, SOFORT or GiroPay
The actual purchase of IOTA on Coinmerce is done very quickly and very easy to complete. You go to the homepage of Coinmerce and then select IOTA (MIOTA) in the dropdown. After the purchase the IOTA will be credited to your Coinmerce Wallet. In the wallet you have the possibility to transfer the IOTA to an external wallet.
The wallet from Coinmerce is from our point of view a good, but not optimal solution for the storage of IOTA, as exchanges and brokers have been hacked several times in the past and large amounts of cryptocurrencies have been stolen. A more recommendable alternative is a desktop or hardware wallet (the Ledger Nano S or the Trezor Hardware Wallet). The next step is to explain how to install the free IOTA Trinity Wallet.
IOTA CFDs on Plus500
Another reputable IOTA broker where you can buy (or sell) IOTA CFDs is, in our experience, Plus500. The user interface is very simple and clearly arranged.
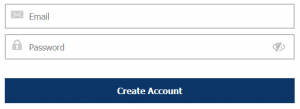
The first step to buy (or sell) IOTA CFDs on Plus500 is to visit the official plus500.com website (click on this link!*)(Risk warning: 80.5% of retail CFD accounts lose money). Enter the email address you wish to use for your account now and enter a password. Then you can create an account.
You will now be logged in automatically and will be taken to the user interface. To buy (or sell) cryptocurrencies, especially IOTA, click in the left bar on “Crypto Currencies” and then on “Buy” (or “Sell”) (framed in red in the screenshot).

Disclaimer: The prices in the image are for illustration purposes only
You will now be taken to a new menu where you will need to enter and confirm some personal information. Fill in the required fields and click on the “Enter” button in the lower left corner.
Afterwards you have to answer some questions about your investment experience. Don’t worry, even if you can’t answer all these questions correctly, you can still buy (or sell) IOTA. Once you have successfully answered the questions, you will be taken to the next step to set up your account. You need to upload the following documents to Plus500 and verify the following information:
- Front and back of your passport
- Proof of residence (e.g. a telephone or electricity bill)
- Verify phone number
- Verify email address
>> Buy and sell IOTA on Plus500 as CFD* <<
Risk Warning: 80.6% of retail CFD accounts lose money.
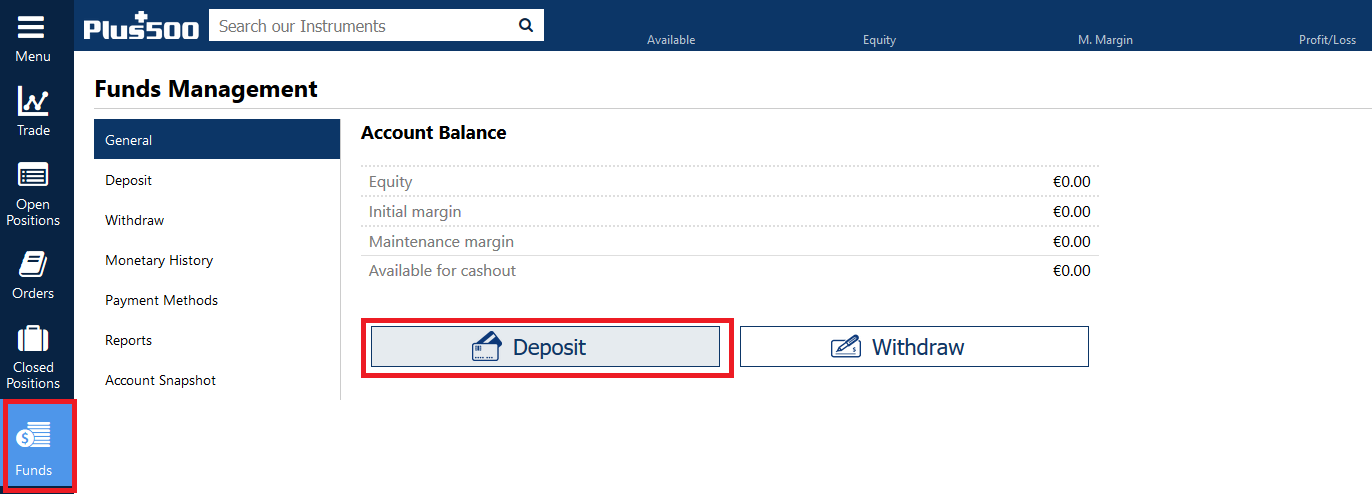
To deposit money into your account, click on “Funds” in the left bar and then on “Deposit” – both are highlighted in red in the screenshot.
You will then be taken to a new page where you can select different payment methods. The following payment options are available to you:
- Deposit via Credit card or Debit card
- Paypal
- Bank transfer
- GiroPay
- SOFORT
The following table shows the respective deposit method, as well as the minimum and maximum deposit amount.
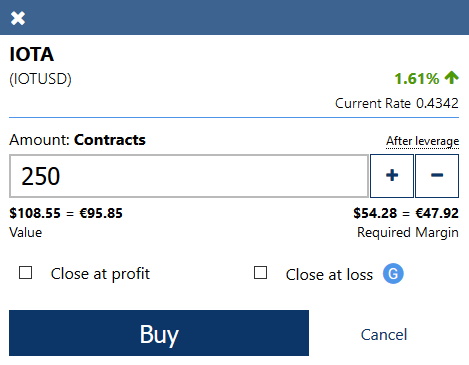
Once you have selected the deposit method that suits you best and deposited the money, you can proceed to buy (or sell) IOTA. Click again on the tab “Crypto currencies” and then on “Buy” (or “Sell”) at IOTA. Now you have to enter in the free field how many IOTA contracts you want to buy (or sell). If you click on “Buy”(or “Sell”) now, you will immediately receive your selected amount credited to your account.
Disclaimer: The prices in the image are for illustration purposes only
>> Buy and sell IOTA on Plus500 as CFD* <<
Risk Warning: 80.6% of retail CFD accounts lose money.
Trade IOTA on Binance
Binance is one of the world’s largest and most popular exchanges, which is not only very secure, but also particularly user-friendly. Until recently (May 2019) it was not possible to buy cryptocurrencies with Euro (or US Dollar) on Binance. This has changed. Besides trading you now have the possibility to buy Bitcoin, Bitcoin Cash, XRP, Ethereum and Litecoin by credit card. As you have probably just noticed, IOTA is not included at the moment, so you only have the possibility to exchange IOTA on Binance for another cryptocurrency.
But first you have to register on Binance. To do this, click on this link (Binance.com) and register*. Unlike many other exchanges, you can verify your identity with Binance, but this is not mandatory. The limits per day are 2 Bitcoin, which corresponds to an approximate value of almost 14,000 euros at present. You can therefore use all functions of Binance without verification. However, it may be advisable to submit the necessary documents to reach a higher limit of 100 BTC.
Step 1: Buy / trade Bitcoin by credit card
Once you are registered, you can buy Bitcoin by credit card on Binance and trade against IOTA. The menu item for the purchase of Bitcoin by credit card can be found in the right part of the menu under “Funds” and “Buy with Credit Card“. Then you will see the following view. Here you have to select “BTC“.
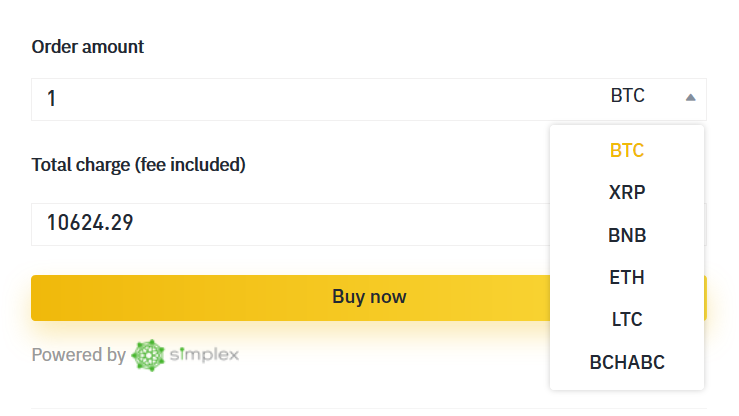
It is important to know that Binance uses the third-party provider “Simplex” to process the purchase. In addition, verification of your identity is required (as opposed to when you “only” use the Exchange).
The purchase process is relatively self-explanatory. In the following we have written a short summary of the steps:
- Choose “BTC” and the currency you want to pay in (Euro or USD).
- Fill in the fields with the personal data.
- Verify your email and phone number with a code.
- Go back to the website and click “Next” .
- Enter your credit card information.
- Upload your documents to verify your identity (front and back of your passport).
Before and after the purchase there are some things to keep in mind:
- The given Bitcoin amount is based on the current price and is not final, but will be calculated later! However, if the rate changes by more than +/-2.5%, you will be asked to reconfirm the transaction by email from Simplex.
- Once the payment is complete, you can check your payment status and deposit history on Simplex.
- The Simplex fee is 3.5% per transaction or USD 10, whichever is higher.
- The daily limit is 20,000 USD per user. The monthly limit is 50,000 USD per user.
- The minimum amount (the minimum) for a transaction is currently USD 50.
Step 2: Guide how to trade IOTA
After you see the Bitcoin on your Binance account, you can start the trade against IOTA. We will show you exemplary how you can exchange Bitcoin (BTC) for IOTA (MIOTA).
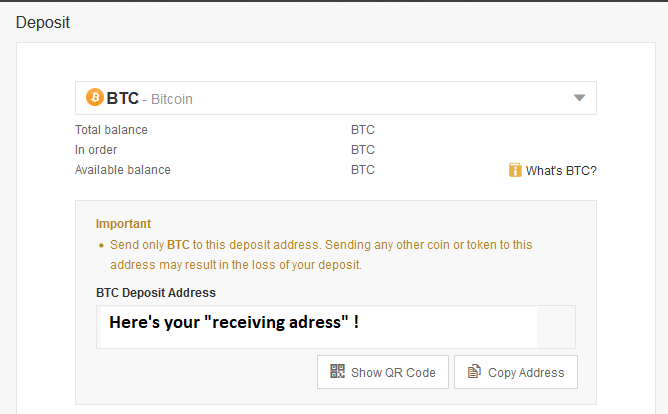
Alternatively, you can of course also transfer Bitcoin from another exchange or wallet to Binance. You can send the BTC directly to the wallet address of Binance. If you don’t own a Bitcoin yet, you can also buy BTC on Litebit with SEPA or via SOFORT. During the purchase process, you simply enter the Bitcoin Wallet address of Binance so that Litebit can transfer the BTC to Binance immediately after the transaction has been successfully completed.
To find out the “Receive address” of your Binance Wallet, click on “Funds” in the navigation bar and then on “Deposits“. You can then enter BTC in the search field and select Bitcoin.
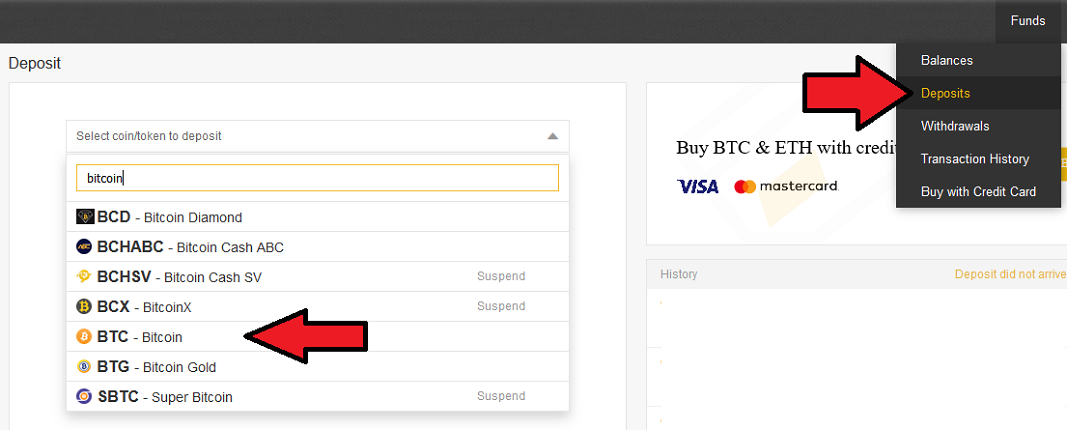
In the following field you will be shown a Bitcoin deposit address. You have to enter this in the “Receive address” field on Litebit during the purchase process if you want to buy BTC on Litebit and then transfer it to Binance.
Either way, you should now have Bitcoin on your Binance Wallet. Now there are only two small steps left to purchase IOTA on Binance. Next to the Binance logo in the top left-hand corner, there is the menu item “Exchange” and below it “Basic“. Select this menu item. Afterwards you get to the following overview (see screenshot below). In the search field (next to the red arrow (2.)) enter “IOTA” and click on IOTA/BTC (step 3).

The display below the price chart then changes. Now you see the following view (below the price chart):
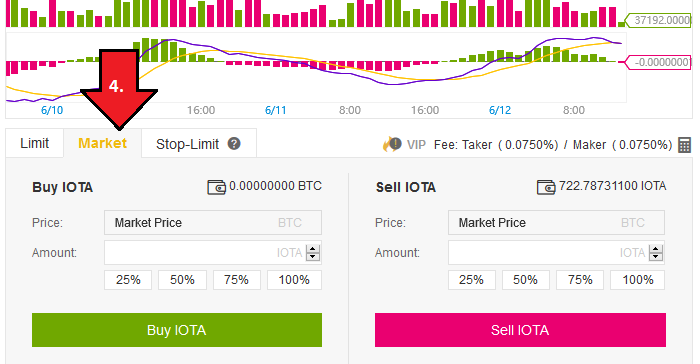
First you have to decide what kind of purchase you want to make. You can choose between “Limit“, “Market” and “Stop-Limit“.
A limit order is an order placed in the order book at a limit price you specify. This means that the trade will only be executed when the market price reaches your limit price. If the market price does not reach the price you set, the limit order remains open. You can delete them at any time. A “limit” order should therefore always be used when you are not in a hurry to buy or sell or want to achieve a certain price.
In contrast, a market order is executed immediately at the current market price (see arrow number 4.). Accordingly, the market order is particularly suitable for beginners and investors who want to sell or buy quickly.
Since you want to sell your Bitcoin and get IOTA for it, you have to use the left field “Buy IOTA”. In the line “Amount” you enter how much IOTA you want to buy. The “Price” line is preset with the “Market Price”, which indicates that you are buying at the market price. When you have entered everything, you can click on “Buy IOTA”.
Normally you will see the IOTA on your Binance Wallet within a few seconds. As with Litebit, however, we recommend transferring the IOTA to an external wallet. This will greatly increase the security of your IOTA, as Binance has already been the victim of a Bitcoin hack in May 2019 (during which 7,000 BTC were stolen). A corresponding manual for the IOTA Trinity Wallet can be found above.
Best IOTA wallet: Trinity
The most recommendable IOTA from our point of view is the Trinity Wallet, which is officially sponsored by IOTA. A major advantage of the IOTA Trinity Wallet is that it is an open source wallet developed by the IOTA developer community. This makes the source code visible and transparent for everyone. In addition, the IOTA Trinity Wallet has a very clear and intuitive user interface. It is also available as a desktop as well as a mobile wallet. The security of the wallet is also very praiseworthy. The Trinity Wallet offers a so-called “Seed Vault” and biometric authentication. The only disadvantage, which should not go unmentioned, is that the Trinity Wallet is currently (June 2019) still in the beta version.
To download the IOTA Trinity Wallet, you have to visit the official website and download the wallet. If you click on this link (click!), you will get to the homepage. Right at the top right you will find the button “Download“. Click the button. Then you have to decide whether you want a desktop or mobile wallet (for the smartphone). You also have the choice between the different operating systems. Depending on your phone’s operating system, you may need to download the Android or Apple version from the Google Play Store or App Store on your phone.
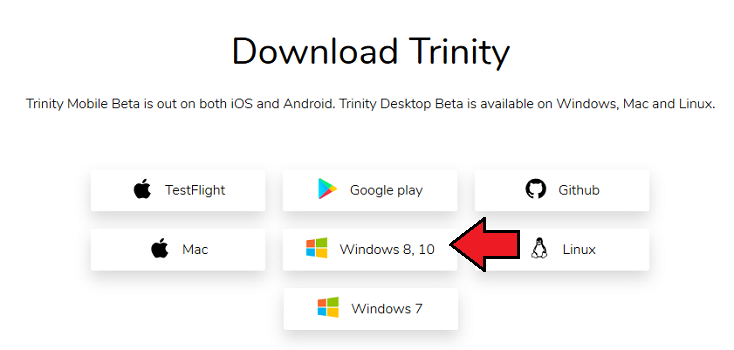
We will show you the installation using the Windows desktop version of the IOTA Trinity Wallet as an example. The installation works basically like a “normal” program for your PC. Once the download is complete, you can install the software. Depending on which browser you are using, this step will differ slightly. In the end you only have to start the download file.
After running the file, you can select your language (English, German, Spanish, Portuguese, French, etc.) and accept the terms of use. You will then be asked if you want to generate a new seed.
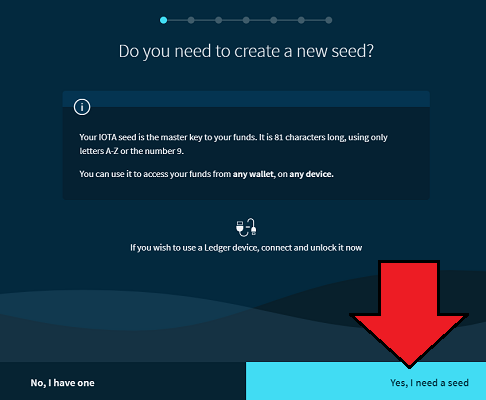
Since you want to create a new wallet, you have to select “Yes, I need a Seed”. The “seed” at IOTA is a string of 81 characters, which are your key to the wallet if you lose your password or change your smartphone. The Trinity Wallet uses a random generator to generate the seed. In the next step you have to select another 10 letters to complete the seed. Afterwards you have to define an account name, which you can choose freely. Since it is extremely important that you write down the seed safely somewhere, the IOTA Trinity Wallet offers you three ways to backup the seed.
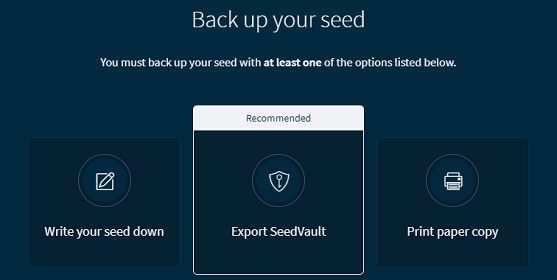
The recommended solution by IOTA is the export of the “Seed Vault”. You create an encrypted file that contains the seed and which you can then store on one or more external devices or data carriers. The process is very simple and well described and should therefore not be a problem. If you have saved the “Seed”, you can simply import it by drag and drop (the file with the extension “.kdbx”). After that you have to enter your key and click “Import SeedVault”.
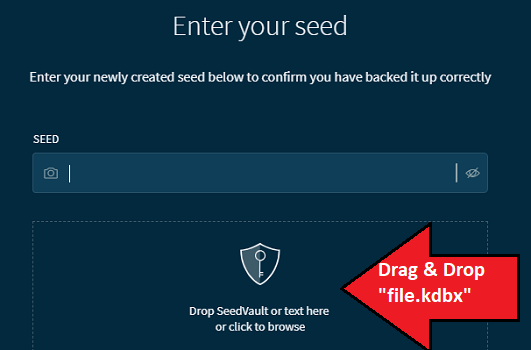
Last but not least you only have to think of a password for the login into the wallet. You have now completely set up the IOTA Trinity Wallet. If you want to change something in your input in the future, you can do this in the “Settings”.
The Dashboard of the Wallet is very simple and clearly arranged:
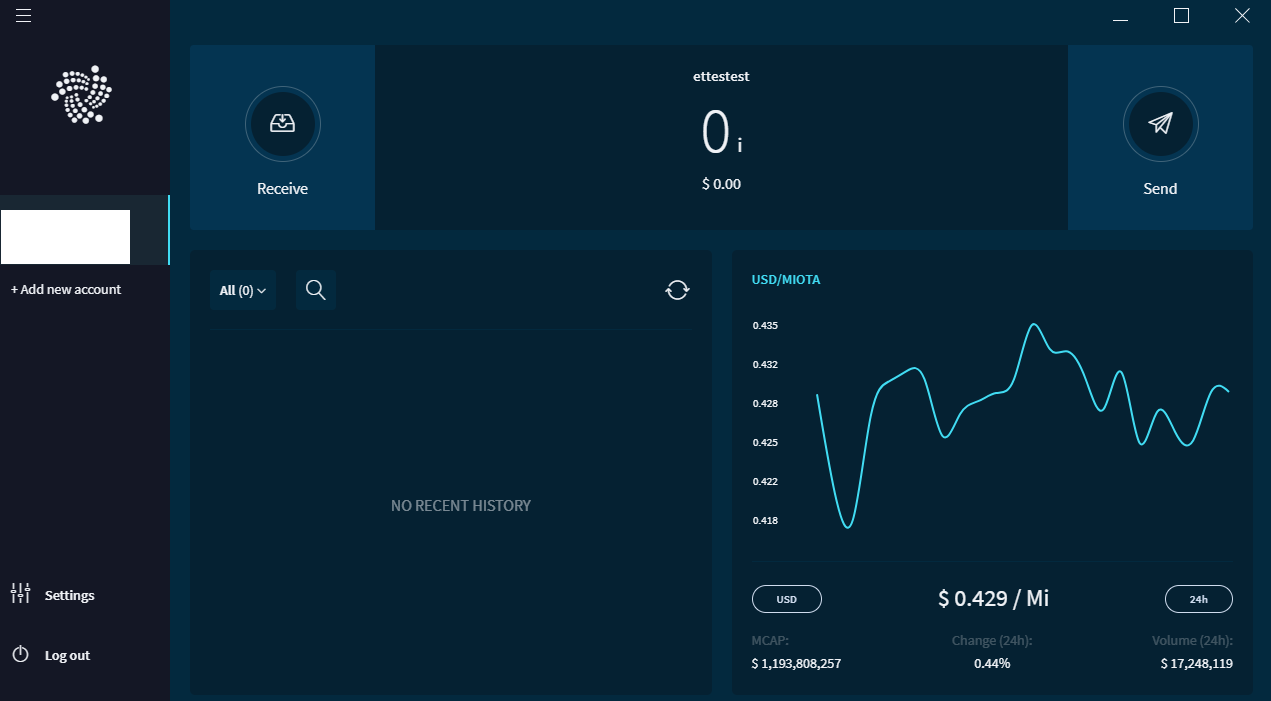
To get IOTA, click on “Receive” and “Generate Address“. Then you can copy the address to your clipboard using the “Copy Address” button and then paste it into a cryptocurrency exchange such as Coinmerce to send your IOTA to the wallet.
Subscribe to our daily newsletter!
No spam, no lies, only insights. You can unsubscribe at any time.
If our purchase instructions have helped you, please rate them:
[ratings]If you have any further questions, please feel free to write us a comment, we will be happy to help you!


