
Ripple is a San Francisco-based software company that has developed a blockchain technology that delivers transactions in seconds to revolutionize the banking system. The company uses the XRP token, which serves as a bridge currency and is intended to guarantee “on-demand” liquidity. In this respect, Ripple’s XRP token can be a very interesting investment. If you want to check the current Ripple (XRP) price before your investment, take a look at our Ripple price index.
There are several ways to buy Ripple (XRP) fast, conveniently, easily and safely. The following is a list of the best Ripple brokers and exchanges where you can invest in XRP in just 5 minutes. But first you have to decide if you want to keep XRP yourself and store it on a wallet or if you want to transfer this function to a trustworthy exchange. There is also the possibility to either buy “real” XRP or XRP CFDs. With CFDs you speculate on the XRP price with the help of a leverage to make bigger profits. In a nutshell, you have the following options to choose from:
- If you want to manage your XRP yourself, buy your XRP on Kriptomat or Litebit and transfer your XRP token to your hardware or desktop wallet.
- If you want to buy XRP, but don’t want to worry about storage, buy XRP on eToro.
- If you want to buy XRP CFDs and speculate on the price with a leverage, use eToro or Plus500
✅ Deposit insurance on capital invested
✅ Trading with a leverage
✅ No wallet setup required
❌ no possession of a real cryptocurrency
❌ high fees for long-term investors
✅ Freedom and independence from third parties (exchanges, brokers)
✅ Lower fees for long-term investors
✅ No obligation to make additional contributions (only total loss possible)
❌ More time required to set up the external wallet
❌ Responsibility for the private key & no deposit insurance

**= Risk warning: 62% of retail CFD accounts lose money when trading CFDs from this provider.
Buy Ripple (XRP) on eToro
The next trustworthy broker we want you to meet is eToro, founded in 2007 by three entrepreneurs. The international group has two registered offices in London (UK) and Limassol (Cyprus) and also has branches in Tel Aviv and Shanghai. The website is available in 20 languages. Due to its clear structure, the site is very user-friendly and the purchase process is fast. Furthermore, the platform is regulated by state.
Start eToro by visiting the official website. Click on this link to go directly to the English version of the website**. Once there, you can create an account by clicking on “Register now”. After a new window has opened, enter the required data. Once you’ve entered your email address and phone number, chosen a username and password, all you have to do is accept the Privacy Policy and Terms of Use, and by clicking “Create Account” you’re done.
**68% of retail investor accounts lose money when trading CFDs with this provider. You should consider whether you can afford to take the high risk of losing your money.
Cryptoasset investing is unregulated in some EU countries and the UK. No consumer protection. Your capital is at risk.
The purchase limits on eToro for Ripple
If your account is fully set up, you can deposit money directly, but you will not be able to use the full eToro offering because you have not yet completed the verification process. Your limit is therefore 2.000€ for the time being. If you want to invest more money in XRP, just follow a few instructions. Go to “Edit” in your profile. You will then be asked to prove your identity and provide your address and tax number. This personal information is important to prevent money laundering and increase security. It is also part of EU law.
In order to be able to start more relaxed and unrestricted, it is definitely worth going through the simple process and verifying yourself right at the beginning. Whether already verified or not, is irrelevant when it comes to loading money into your account. Log in and click on “Deposit Funds”.
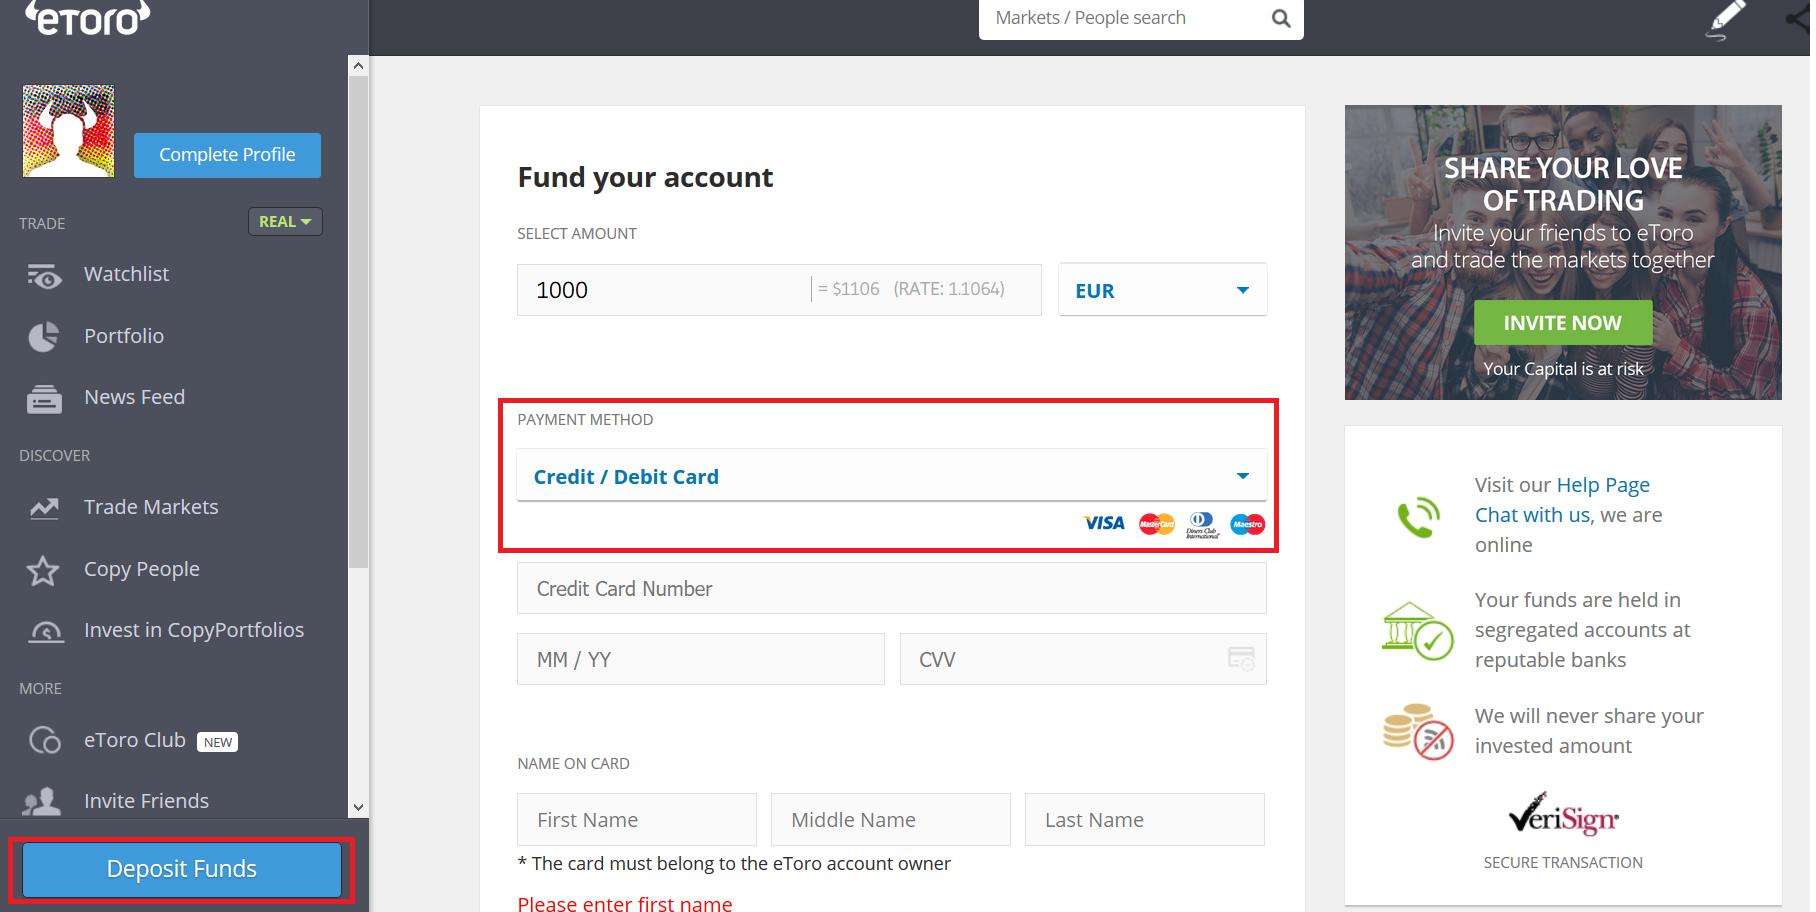
Now enter the desired amount and the currency and choose one of the deposit methods. You can choose between bank transfer, credit card, SOFORT or e-wallet. The following table gives you an overview of the respective payment methods. Which payment method you can use depends on your residence.
The e-wallet PayPal is particularly popular, uncomplicated and popular. If you choose it as payment method and enter for example an amount of 500€, you will immediately be forwarded to PayPal and can register there. Once you have confirmed the transaction there, you will automatically be taken back to the eToro page. With the money you now have on eToro, you can start buying Ripple right away.
Buy Ripple on eToro
On eToto you can buy both “real XRP” and so-called XRP CFDs. We’ll now show you how to buy real XRP.
In contrast, all buy positions with leverage are executed as CFDs. CFDs are so-called derivatives – a security whose value or performance depends on the performance of one or more underlying assets. They are specialized and popular over-the-counter (OTC) financial products that allow traders to easily open positions in a variety of different financial markets. The underlying asset – Ripple (XRP) – is not acquired by the investor. All you receive is a certificate.
Buy “real” XRP Tokens
To buy Ripple, first click on “Markets” and then on “Crypto”. You will now see all fifteen available cryptocurrencies.
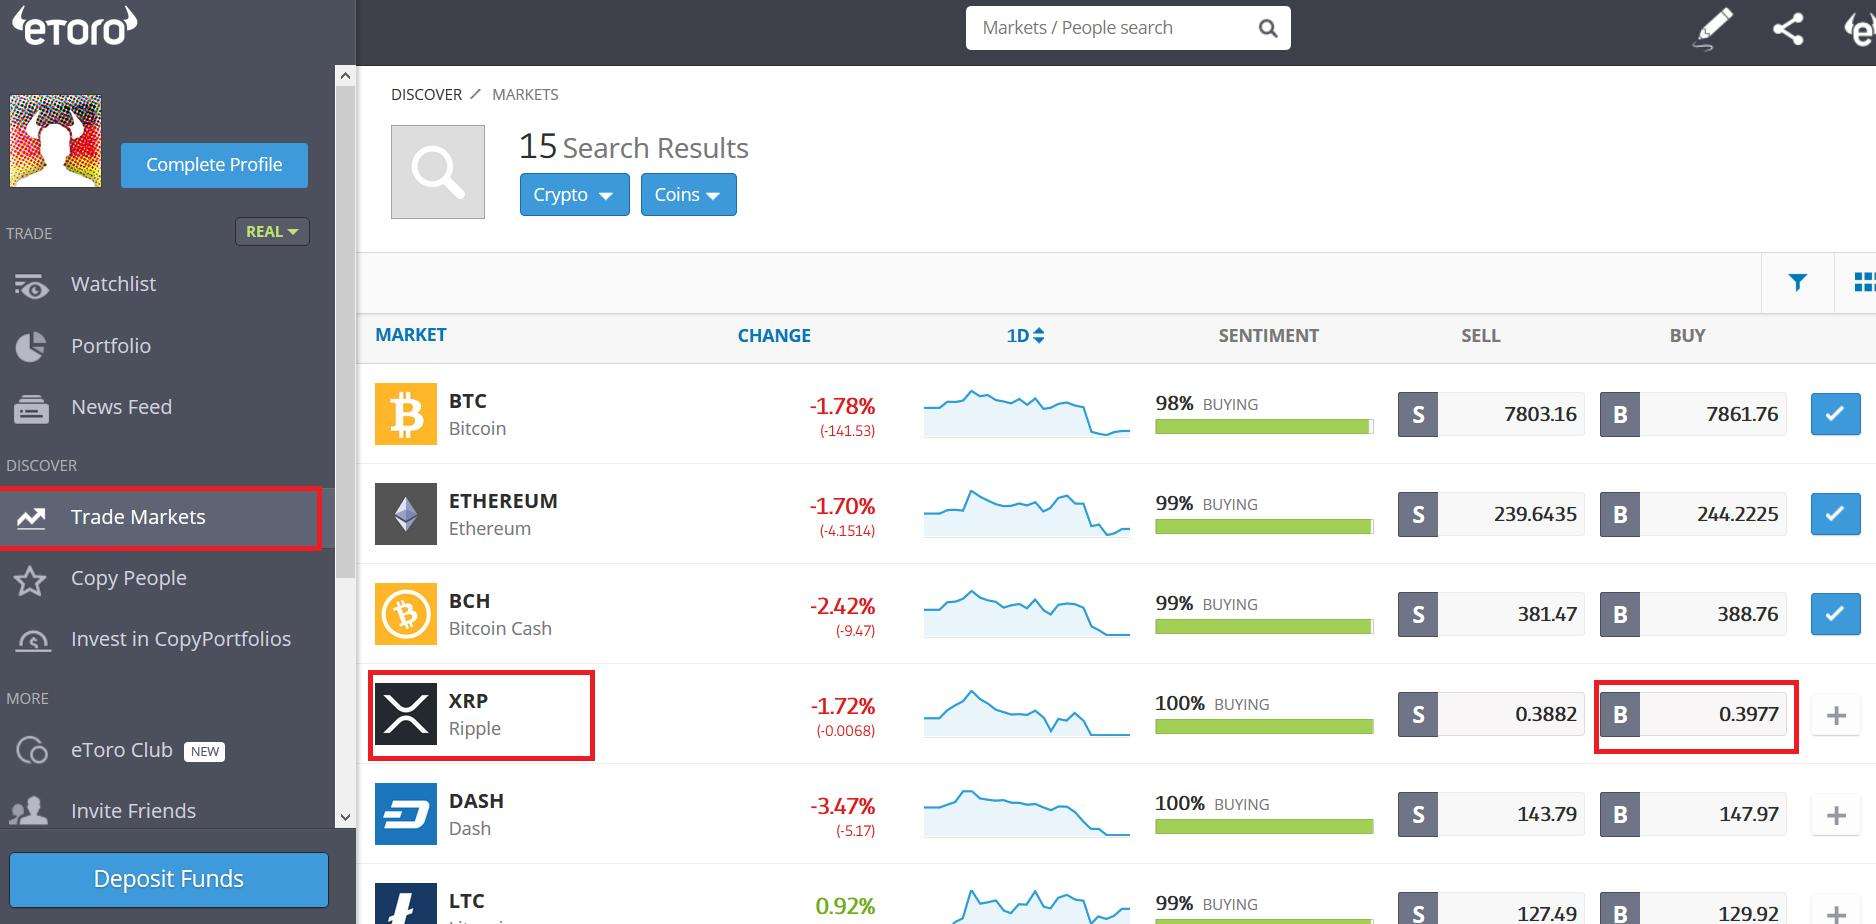
Finally choose “Ripple”. Now you will see two abbreviations, where “B” stands for Buy XRP and “S” for the sale. If you have clicked on the “B”, you only have to enter an amount and click on “Buy”.
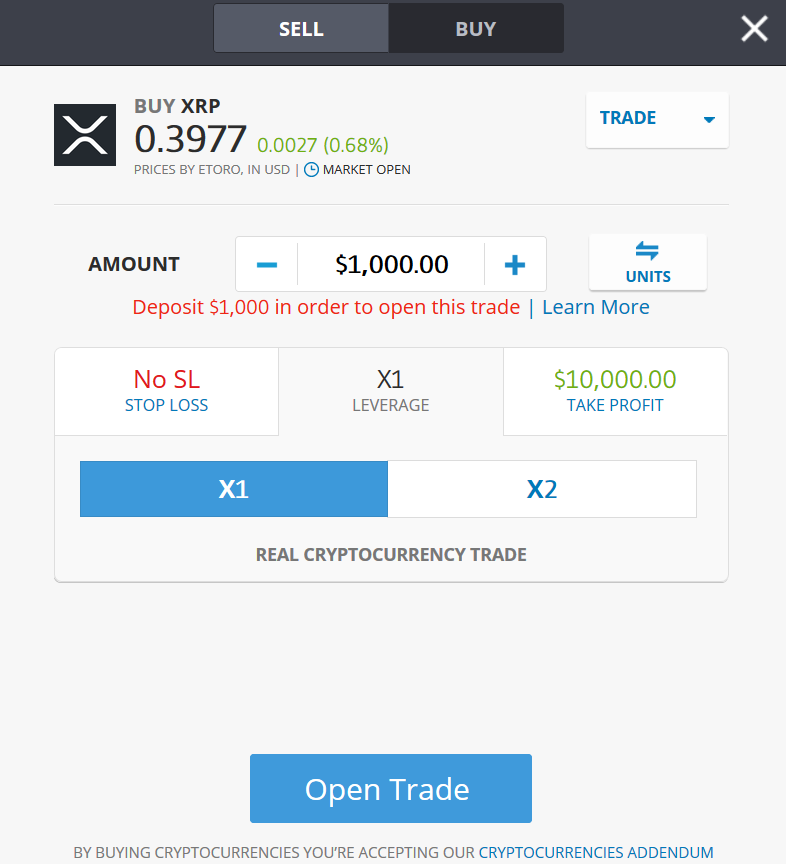
After a few seconds, your transaction is complete and you’ve bought Ripple super fast and hassle free. The XRP are now stored on your eToro account / wallet.
>> Buy and sell XRP on eToro now** <<
**68% of retail investor accounts lose money when trading CFDs with this provider. You should consider whether you can afford to take the high risk of losing your money.
Cryptoasset investing is unregulated in some EU countries and the UK. No consumer protection. Your capital is at risk.
Buy Ripple / XRP CFDs
Buying XRP CFDs works almost the same as buying the “real” XRP. To buy XRP CFDs you need to click “B” again to buy XRP. You will then be taken to the familiar overview.
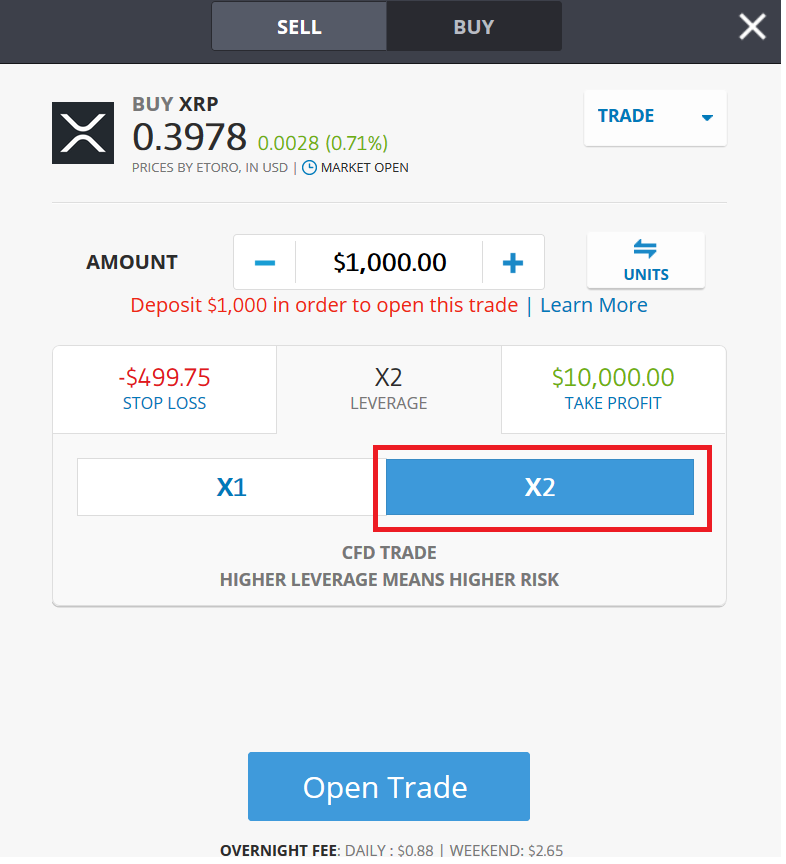
Here you can enter the amount of money you would like to invest for your XRP purchase. Now you have to set the leverage multiplier “X2”. Currently, eToro does not offer a larger leverage for cryptocurrencies. After selecting “X2”, you should check your Stop Loss and Take Profit settings. A stop loss limit is very important to keep the risk low. Once you have adjusted these settings as desired, you can open the trade.
Stop Loss simply means that you close a trade if the XRP price reaches a fixed price or an amount of money that you can set.
Take Profit specifies in detail when your trade is fully automatically closed when the profit of your trade reaches the amount you desire. It’s also important to note that eToro charges “overnight fees”, also known as rollover fees. This notice will also pop up before you place your order.
>> Buy and sell XRP CFDs on eToro now** <<
**68% of retail investor accounts lose money when trading CFDs with this provider. You should consider whether you can afford to take the high risk of losing your money.
Cryptoasset investing is unregulated in some EU countries and the UK. No consumer protection. Your capital is at risk.
The eToro Ripple (XRP) Wallet
Since March 2019 eToro offers the possibility to store different cryptocurrencies on a mobile wallet (one app). The app makes it possible to transfer your “real” XRP from the exchange to your own wallet and manage the XRP on the wallet.
The eToro XRP Wallet offers a wide range of features, so you may be interested in using the eToro Wallet. It allows you to send your XRP to other crypto exchanges and/or to a hardware wallet.
Besides the safe storage of the XRP-Coins, the wallet offers the following additional functions:
- a crypto-to-crypto exchange
- paying in shops
- make deposits
To use the app, you must download it for free from either the Google Play Store or the Apple Store. Once you’ve done that, you can read this guide again. Once you have downloaded and installed the app, you can now send your XRP to the wallet. Proceed as follows.
First click on the “Portfolio” tab and then on the settings icon, marked with a red arrow in the screenshot.
Now you have the possibility to transfer your XRP to the wallet under the tab “Invest”. Note that the transfer only works on the wallet of eToro and not on any other wallet! Only when your XRP is on the eToro mobile wallet can you send it to another exchange (e.g. Binance) or wallet.
The transfer to the eToro mobile Wallet can take up to one day. After that it will take some time until the transaction is written into the blockchain and the XRP coins are visible on your wallet. As long as the transaction has not yet been executed, you will find the name “pending transfer”. Also note that eToro charges a transaction fee and additional transaction fees for using the blockchain.
>> Buy and sell XRP on eToro now** <<
**68% of retail investor accounts lose money when trading CFDs with this provider. You should consider whether you can afford to take the high risk of losing your money.
Cryptoasset investing is unregulated in some EU countries and the UK. No consumer protection. Your capital is at risk.
Minimum Deposits and Processing Fees
When trading on eToro there are some special features to consider:
- All accounts are maintained in US dollars. Therefore your deposit will be converted into US dollars immediately. This will be done at the current exchange rate. Conversion fees apply for this conversion.
- The minimum deposit is 50 USD. If you choose bank transfer as your deposit method, the minimum amount is 500 USD.
- A withdrawal handling fee will be charged for withdrawals. You can see the fee for each withdrawal in the last step of the checkout area. For withdrawals greater than 50 USD, the fee is 5 USD.
eToro is a multi-asset platform which offers both investing in stocks and cryptoassets, as well as trading CFDs.
Please note that CFDs are complex instruments and come with a high risk of losing money rapidly due to leverage. 68% of retail investor accounts lose money when trading CFDs with this provider. You should consider whether you understand how CFDs work, and whether you can afford to take the high risk of losing your money.
Past performance is not an indication of future results. Trading history presented is less than 5 complete years and may not suffice as basis for investment decision.
Copy trading is a portfolio management service, provided by eToro (Europe) Ltd., which is authorised and regulated by the Cyprus Securities and Exchange Commission.
Cryptoassets are volatile instruments which can fluctuate widely in a very short timeframe and therefore are not appropriate for all investors. Other than via CFDs, trading cryptoassets is unregulated and therefore is not supervised by any EU regulatory framework.
eToro USA LLC does not offer CFDs and makes no representation and assumes no liability as to the accuracy or completeness of the content of this publication, which has been prepared by our partner utilizing publicly available non-entity specific information about eToro.
Buy XRP on Kriptomat
About Kriptomat
In contrast to the established broker eToro, Kriptomat is much smaller, less known and also much younger. Nevertheless this can be an advantage. Kriptomat offers more than 30 different cryptocurrencies, and thus has a larger portfolio than eToro. Moreover, the broker is aimed primarily at newcomers to the crypto sector, focusing on an easy-to-use interface that allows anyone to buy and trade cryptocurrencies.
But Kriptomat is also a good option for experienced crypto investors. There are several reasons for this. On the one hand, Kriptomat is fully licensed in Estonia and thus meets the strict European guidelines, which means that the broker can be classified as very serious and secure.
On the other hand, there is a second unbeatable advantage, which will certainly convince any investor who wants to buy a cryptocurrency via Euro: the fees. In contrast to other exchanges and brokers, Kriptomat does not require a “spread”, the price premium that the exchanges and brokers can freely determine. Kriptomat only charges a flat fee, which depends on the payment method and is shown in the table below.
| Transaction | Fee % | Minimum |
|---|---|---|
| SEPA (Euro to crypto) | 1.45% | 1,45 EUR |
| Zimpler | 2,89 % | |
| Skrill | variable | |
| Neteller | variable | |
| SEPA sell (crypto to Euro) | 1,45% | 1,45 EUR |
| Credit card >100 EUR | 3,65 % | |
| Credit card <100 EUR | variable |
>> Buy Ripple (XRP) on Kriptomat* <<
Registration with Kriptomat
Due to the strict European KYC and AML guidelines, Kriptomat has to perform a comprehensive verification of your person before the first purchase of Ripple (XRP). To start the registration process, go to the official website kriptomat.io* and click on the orange “Register” button. On the following page, Kriptomat will ask for your first and last name, an e-mail address and a password.
After confirming the details, the broker will send you an e-mail with a confirmation link, which you use to confirm the existence of the e-mail address. Then you can log on to Kriptomat for the first time with your new access data. In order to buy Ripple (XRP) and use the other features of the exchange, you will need to provide some more personal data and proof.
First you have to enter and verify your phone number. Kriptomat will then send you an SMS containing a verification code that you have to enter on the website. Afterwards you will have to register your personal data. You can do this by following step 3 of 4 (see screenshot).
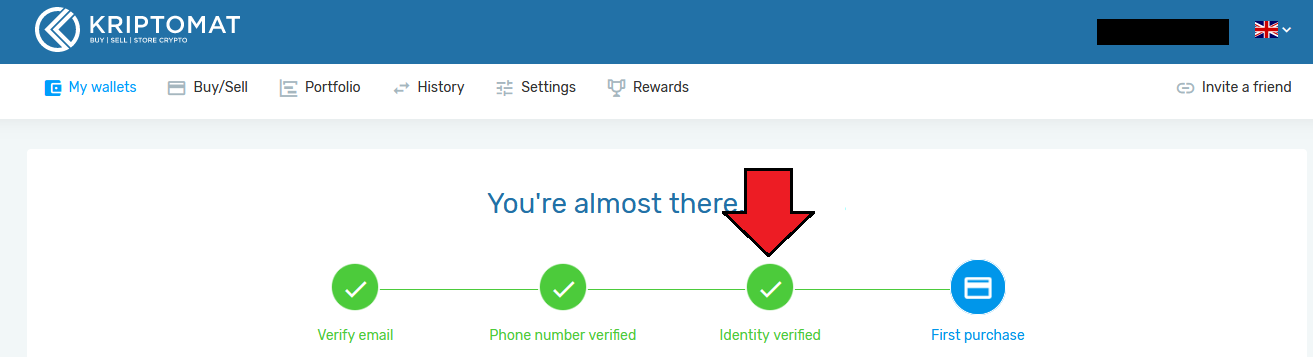
This opens a new pop-up where you can enter your address (street, house number, city, country). It is also necessary that you upload a photo or scan of your passport or identity card. This process, which is usually very cumbersome, is easily solved by Kriptomat by allowing you to continue the registration process on your smartphone (you cannot miss the option for this).
If you choose this option, which we highly recommend, Kriptomat will send you an SMS with an individual link so you can continue the registration process on your smartphone. This way you can easily take a photo of your ID (front and back) and upload it directly. The same applies to the last step, a selfie of yours.
Once you have completed the registration process described above, you will have the following limits to purchase Ripple (XRP):
| Transaction | Limits |
|---|---|
| Daily deposit and withdrawal via SEPA | 25,000.00 EUR |
| Monthly deposit and withdrawal via SEPA | 200,000.00 EUR |
| Deposit and withdrawal in cryptocurrencies | no limit |
| Daily limit for other payment methods | 500.00 EUR |
| Monthly limit for other payment methods | 5,000.00 EUR |
If you want to buy XRP via SEPA bank transfer, a fourth, final step is also necessary. In order to use SEPA for deposits, it is necessary to link your bank account to your Kriptomat account. You can then deposit money via SEPA and then use your “credit” to buy XRP. If you use Neteller, Skrill or your credit card, this is not necessary.
>> Buy Ripple (XRP) on Kriptomat* <<
Buy XRP on Kriptomat
Buying Ripple (XRP) on Kriptomat is really very easy and should not be a big challenge even for people who have never bought cryptocurrencies before. First go to the tab “Buy / Sell” (step 1) and then select the tab “Buy” (step 2). In the area below, you can search and click on Ripple (XRP).
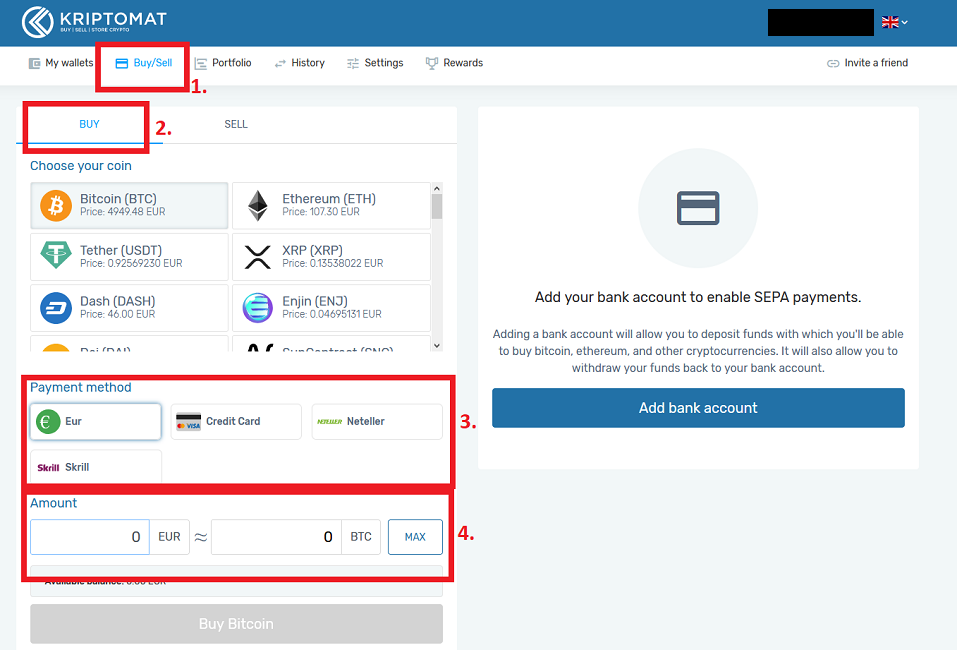
Then you can choose one of the four payment options presented. As described above, SEPA offers the lowest transaction fee, but also has the disadvantage that it takes longer to deposit than credit card, Neteller or Skrill payments, which allow instant purchases. In the fourth step (see screenshot) you only need to specify your purchase amount. After you click on “Buy XRP” you will see the transaction fees that will be charged for the order. To finalize the purchase, click on “Confirm transaction”.
The purchase is now complete and the website will redirect you to your “My Wallet” section. Under normal conditions, the XRP should appear in your account within a few seconds. A good summary of the purchase process is also provided in the following video tutorial:
>> Buy Ripple (XRP) on Kriptomat* <<
Buy Ripple (XRP) on Litebit
Litebit.eu is a recognized exchange that was launched in 2013 and is based in the Netherlands. More than 50 cryptocurrencies can be traded and managed easily and securely on the platform. Both the very good service and the high security are reasons why we have been a satisfied customer of LiteBit for more than 4 years.
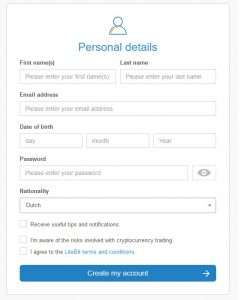 Before you can start trading, you must create an account. Click on this link to go to the official litebit.eu website*. Now LiteBit needs some personal information from you that is required for the legally required KYC (“Know Your Customer”) process and is self-explanatory. Please fill in all required information. Once you have filled in the fields, click on “Create my account”. Now you will receive an email with a confirmation link which you can click to activate your account.
After successfully authenticating your email address, you will automatically be taken back to the LiteBit website and can log in by simply clicking on the “Log in” button and entering your email address and password.
>> Register on Litebit now* <<
Buying limits for Ripple/XRP at LiteBit
How much money you can trade every day, week or month on LiteBit depends on your verification level. The verification process is divided into several steps. More information is required from you to reach a higher level. If you reach a higher level, your purchase limit also increases.
If you have registered as described above, you are still “Unverified” and cannot yet buy a Ripple or XRP. Litebit calls each level “Tier”. To buy Ripple, you must be in the first verification level, “Tier 1”. To do this, enter your phone number, which will send you an SMS with a code, which you then enter on the website. The second stage, “Tier 2” requires a document with your address, date and name clearly visible. The document can be either an invoice, bank statement, rental agreement or a government issued document no older than three months.
With the help of a copy of your passport or ID card you can finally unlock the third, “Tier 3” and last verification level. Scan the front and back of your passport and send the scans to the website. Once you have reached the highest level, you can trade cryptocurrencies for up to €500,000 each month. The following table shows how high the limits are in the respective “Tiers”.
In addition to the limits that depend on the different verification levels, the payment type is also important. This can also result in purchase limits. The following table shows the respective conditions for the use of different payment methods.
Super easy: Buy Ripple at LiteBit
Once your account is created with LiteBit, you can start directly with the actual purchase of Ripple, which is very straightforward on the platform. Simply click on the “Buy” tab at the top right of the page. Now the page opens on where the individual cryptocurrencies can be seen. Select Ripple by clicking on it. Now you get to this new page:

You can now enter the amount of Ripple (XRP) you want to purchase. You can enter your desired purchase amount either in the left box directly in XRP or in the right field in Euro, here framed in red. Below these two fields, there is another field labeled “Receive Address”, here framed in green. This is the receiving address, i.e. the address of your Ripple Wallet, to which your purchased XRP units will be sent later.
If you are using a LiteBit wallet, you do not have to enter the address yourself, but just click on “Use LiteBit Wallet”, which will automatically enter the address. However, if you are using another wallet, enter its address in the field provided.
Since hacker attacks have occurred on some platforms, stealing a lot of money in the form of cryptocurrencies, LiteBit’s wallet is not 100% secure either. The security can be increased by activating the 2-factor authentication, which is an extension to the standard login, which consists only of e-mail address and password.
If that’s not enough for you, we can recommend desktop and hardware wallets such as the Ledger Nano S or Trezor, where you can also save your cryptocurrency offline. If you have filled in all fields, you must now select a payment method. We recommend a simple bank transfer as this payment method has the lowest fees.
If you decide to make a “bank transfer”, select Sepa Bankwire in the “Payment method” tab. Then click on “Next”. In the next step Litebit will show you account information to which you have to transfer the amount you have set. Litebit will ask you to assign a specific purpose. You should do this because Litebit can register and assign your payment faster. Normally the transfer is received within 24 hours by Litebit and your XRP will be sent immediately to your Ripple wallet.
>> Buy Ripple (XRP) on Litebit now* <<
Buy Ripple/XRP from Coinmama
This platform for trading cryptocurrencies was founded in 2013 in Israel and is still based there today. On Coinmama you can buy Ripple very fast and without much effort directly with Euro. First of all you have to create an account.
To register on the official site, simply click on this link* and enter your email address, password, first and last name in the upper four fields. You must also select the country in which your residence is located. Once you have selected your country, you can click on “Create account” to complete your account creation. By opening your account, you agree to Coinmama’s Privacy Policy and Terms of Use, which you can read in advance by clicking on the blue words “Terms” and “Privacy”.
To make sure that this is your real email address, you need to log in to your email account and click on the confirmation link that is in an email from Coinmama. If you don’t find the activation email directly in your inbox, check the Spam section. Once you have opened the link, your account is activated and you will be redirected to Coinmama’s homepage, where you will find the button “Log In” in the upper right corner, where you can register by entering your e-mail address and password.
In order to buy Ripple, you must first verify yourself. Go to “Verify Me” and enter the desired information. Once you have done this and clicked on “Next”, you can either upload copies of your passport, identity card or driver’s license. In addition, you will be asked for a Selfie, on which you will see a sheet with the name Coinmama and the current date next to your face. Once you have mastered these steps, you only need to submit the files so that they can be checked. To do this, click on “Send for Approval” in the lower right corner. The approval process takes a maximum of 24 hours and once completed, you can start buying XRP.
Click on “Buy” in the navigation bar on the right, select Ripple (XRP). Now you can choose whether you want to buy XRP with Euro or USD and either choose a preset or round amount or enter a specific one yourself.
At Coinmama you can currently buy XRP using the following payment methods:
- Credit Card
- Debit Card
- Bank Wire
Additional fees may apply to the purchase of XRP.
- When purchasing XRP by credit card or debit card, the payment processor charges a fee of 5%.
- It is recommended to pay by bank transfer, as there is no processing fee. SWIFT transfers are subject to a fee of GBP 20 if the amount is less than USD 1,000.
Further information is also helpful:
- Deposits are accepted in all major currencies, i.e. you can pay with your local currency. However, prices are displayed in either USD or Euro.
- You can also sell your XRP on Coinmama again.
- The minimum purchase amount for XRP is 60 USD.
The daily limit is USD 5,000 and the monthly limit is USD 30,000. Five orders can be placed in twenty-four hours and a maximum of 20 in thirty days, regardless of the size of the orders.
Buy XRP on Binance
The name “Binance” is made up of the words “binary” and “finance”, which describe the link between technology and the financial world. The international trading platform is one of the largest crypto exchanges in the world and was launched in July 2017. With a settlement rate of up to 1.4 million orders per second, it is also one of the fastest exchanges on the market today.
Binance offers the purchase of XRP with credit card. If you already own Bitcoin, Ethereum or Tether, you can also trade these cryptocurrencies against XRP. We will show you both options in detail.
Register an account on Binance
Registration with Binance (click here!)* is quick and free of charge. All you need is your e-mail and a secure password and then a jigsaw puzzle must be moved to the right place and your e-mail address confirmed via the activation link.
After the first login, you can also protect your Binance account with “Two Factor Authentication” or SMS authentication. This can be found under the menu item Account and in the Google Authenticator area. The Google App is available in the App- and Playstore and can be downloaded free of charge. This authentication protects your account from unauthorized access, as the authentication code is required before each login. The QR code must be scanned in with the smartphone and the appearing numerical code must be entered afterwards in the appropriate window. SMS authentication is only possible with a Chinese mobile phone number.
Limits on Binance
On Binance, you can use all functions even without verification. The purchase limits per day are 2 Bitcoin. If you verify yourself, you have a much higher limit of 100 BTC at your disposal.
Buy XRP with Credit Card
The menu item for buying XRP by credit card can be found in the upper menu under the tab “Funds” and “Buy with Credit Card”. Now you get to the following view:
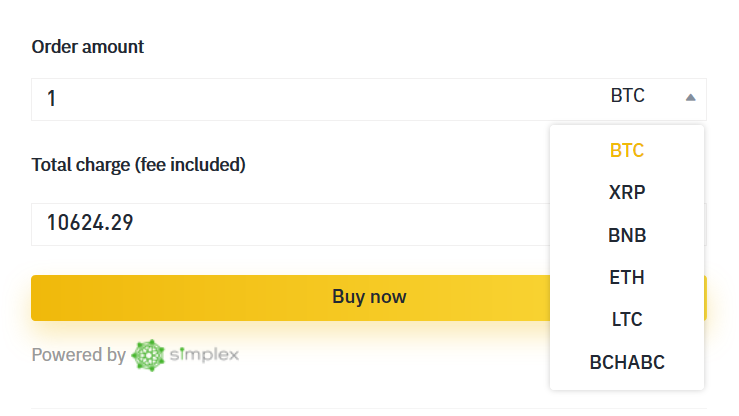
It is important to know that Binance is working with Simplex to process the purchase. The purchase process itself is relatively self-explanatory. We have nevertheless compiled a short summary of all the steps:
- Select XRP and the currency you want to pay in (Euro or USD).
- Fill in all personal data.
- Verify your email address and phone number with a code you will receive by email and SMS.
- Once you have taken these steps, go back to Binance.com.
- Enter your credit card information.
- Upload your documents to verify your identity (front and back of your passport).
Before and after the Ripple purchase there are some things to keep in mind.
- The specified amount is based on the current XRP rate and is not final, but will be recalculated later, at the time of settlement. If the rate changes by more than +- 2.5%, you will be asked to reconfirm the transaction by email from Simplex.
- The transaction fee is 3.5% or 10 USD, whichever is higher.
- The daily limit per user is 20,000 USD. The monthly limit is 50,000 USD.
- Furthermore, a minimum deposit amount of currently 50 USD applies.
Once you have understood this information and completed the steps, you can quickly and easily purchase XRP.
>> Buy Ripple (XRP) on Binance* <<
Trade Ripple for Ethereum
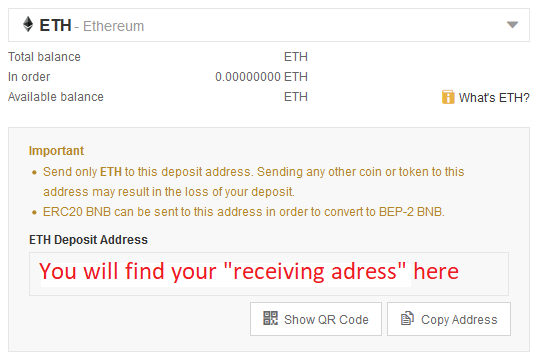
If you already have some Ether (ETH), you can send them immediately to the address of the Binance Wallet. If this is not the case, you can buy ether quickly and easily on LiteBit. To do this, enter the wallet address of Binance when you purchase so that the Ether (ETH) can go directly to Binance.

You will find your Binance Wallet address, which you must enter when buying the Ether at LiteBit, if you have registered with Binance and go to “Funds” and then “Deposits”. Now enter ETH in the search field and click on “Deposits”. You will now see your deposit address for Ether. Copy it and enter it on LiteBit as the “receiving address”.
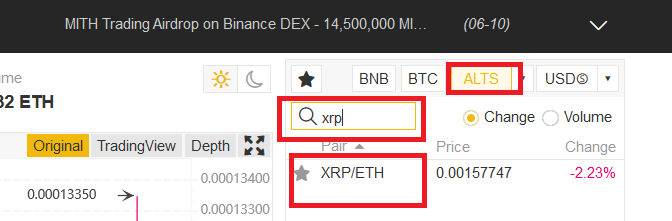
As soon as the ethers have been transferred to your Binance Wallet, you can start exchanging them for Ripple. First click on the Binance logo in the upper right corner. If you are on the page, go to “ALTS Markets” and select Ripple or XRP/ETH.
First you have to decide what kind of purchase you want to make. You can choose between “Limit“, “Market” and “Stop-Limit“.
A limit order is an order placed in the order book at a limit price you specify. This means that the trade will only be executed when the market price reaches your limit price. If the market price does not reach the price you set, the limit order remains open. You can delete them at any time. A “limit” order should therefore always be used when you are not in a hurry to buy or sell or want to achieve a certain price.
In contrast, a market order is executed immediately at the current market price (see arrow number 4.). Accordingly, the market order is particularly suitable for beginners and investors who want to sell or buy quickly. That’s why we recommend to use “market” option and select the left field “Buy XRP” and enter how much XRP you want to buy at “Amount”. The line above shows the price for an XRP in ETH.
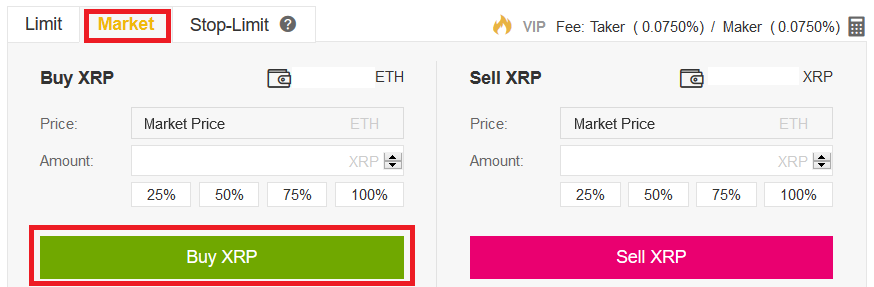
Once you have selected your desired amount, you can see in the bottom line (“Total”) how much ETH your XRP purchase will cost. If you then click on “Buy XRP”, your order will be processed immediately and after a few seconds your ripple units will be in your wallet.
>> Buy Ripple (XRP) on Binance* <<
Best XRP wallet: Toast wallet
There are many different XRP Wallet providers on the market. Each wallet differs in simplicity of use and security level. We introduce you to the desktop wallet “Toast Wallet“. Even if the name sounds a bit funny, the Ripple Desktop Wallet offers a very secure and very easy way to save your XRP tokens.
The first step is to download the wallet from the official website. You have to go to this website (click, you will get directly to the official website) and download the wallet. The Toast wallet is available as a desktop as well as a mobile version for your mobile phone. Our manual refers to the Ripple desktop wallet for Windows. On the website you have to download the respective Ripple Wallet: either for Windows, Linux or Mac. We downloaded the Windows 10 Installer because we are using Windows 10. When the software is downloaded, just click “Open”. Some files will then be unpacked and the installation process will take no longer than 10 seconds.
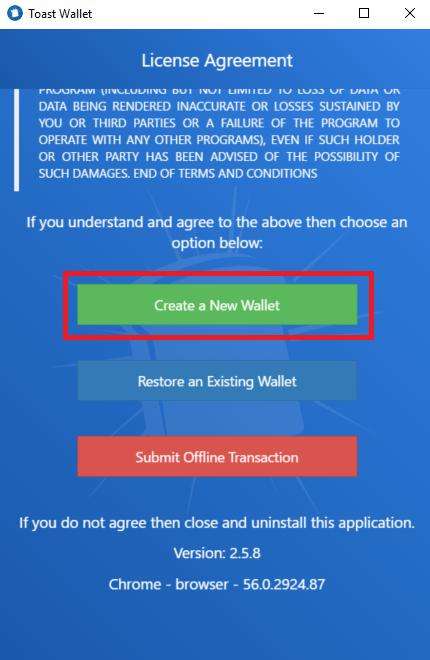
Now you have to accept the license agreement if you want to use the wallet. Since you don’t have a wallet yet, click on “Create a New Wallet”, framed in red.
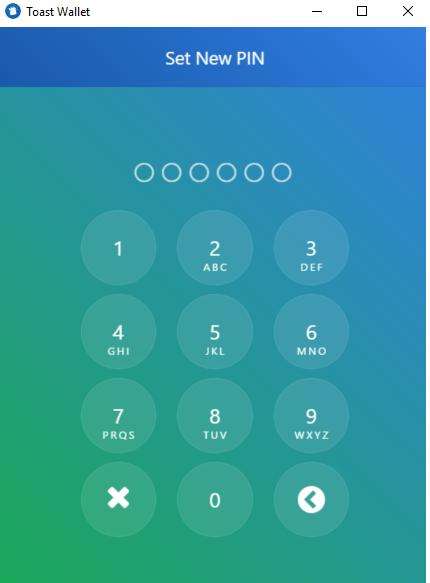
The next step is to assign a 6-digit PIN. You have to write this down in a safe place, because you have to enter this pin with every login.
If you have successfully set the PIN, you must now set a password. If you have also successfully completed this step, you will now receive your “Recovery Phrase”.
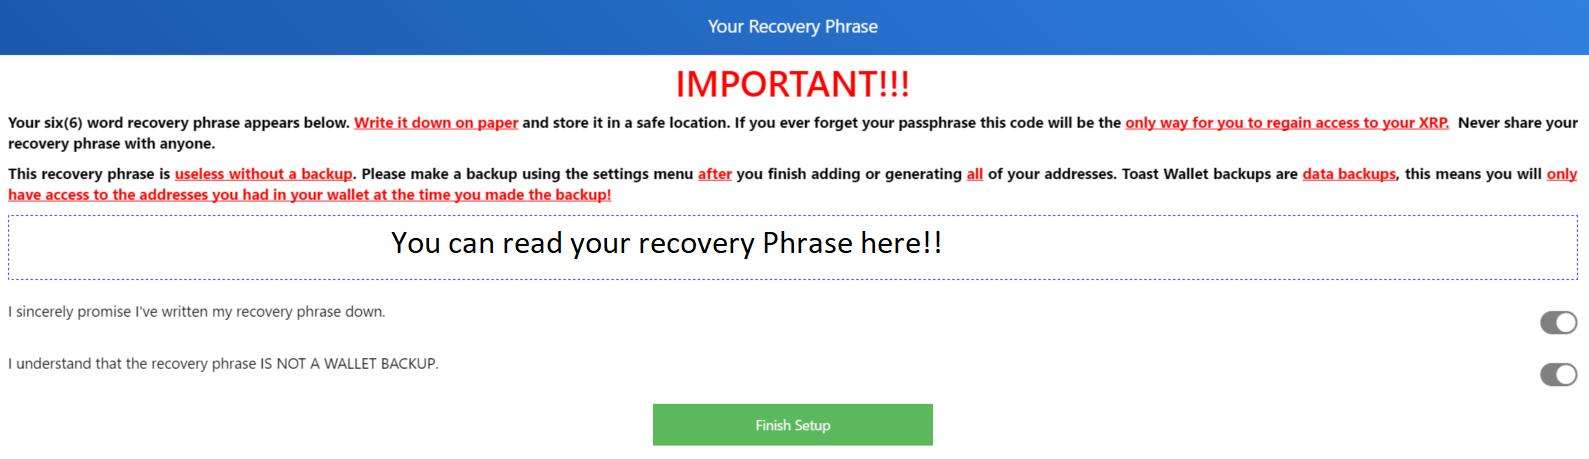
This phrase is very important and is used in an emergency to restore access to your wallet. Write this phrase down on a piece of paper in a safe place. When you have completed this step, click on the green button “Finish Setup”. Now you get to the Wallet interface.
At first you won’t find any further functions. To open an account, click on the blue plus sign in the middle of the screen. Then you have three different options:
- “Generate New Adress”
- “Add existing Adress”
- “Get a Vanity Adress”
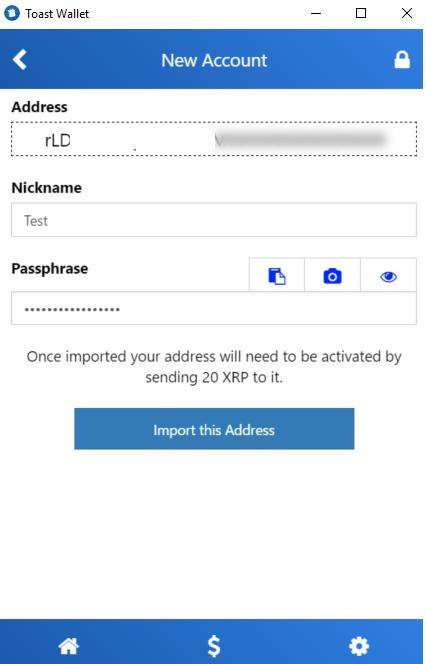
Since you want to create a new address, click on “Generate New Adress”. Below you can give your XRP address a nickname. You will also need to re-enter your password to import the account. Now click on “Import this Address”. Once you have imported your first XRP address, you will need to back up your wallet. This is mandatory and the wallet commands you to do this completely automatically.
Now click on the pink button “Create a Backup Now”. Now you have to copy and save your backup. The easiest way is to save your backup in a text file. You will need this if your Ripple Wallet has an error and you have to create a new Wallet. Afterwards you can click on the white house in the corner below. Then you will be taken back to the start interface and you will see the XRP address you just created. To activate your account, click on your XRP address, framed in red.
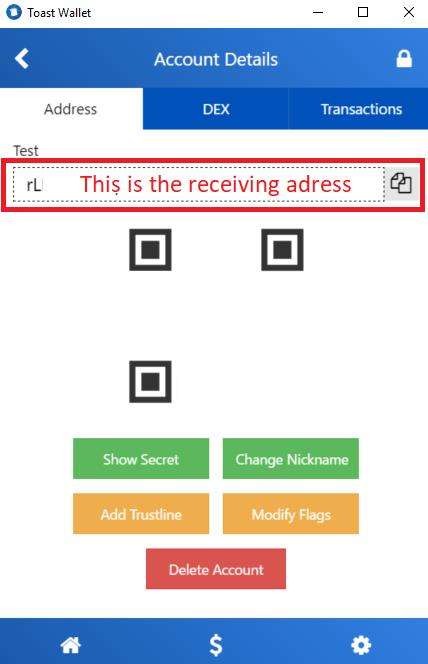
Now you will see your receiving address, which you have to give to Litebit or other exchanges, if you want to transfer your XRP to this wallet. To activate the account you have to send at least 20 XRP to your receiving address, framed in red.
You have to insert your receiving address in the column “Receiving address” of Litebit, if you want to send your XRP to the toastwallet. Once you have deposited XRP into your account, sending or “withdrawing” it is very easy and self-explanatory. If you have any questions about the wallet creation, please write us a comment, we will be happy to help you. Otherwise we wish you a lot of fun with your XRP!
Subscribe to our daily newsletter!
No spam, no lies, only insights. You can unsubscribe at any time.
Please rate our purchase instructions:
[ratings]If you have any questions, please leave us a comment, we will be happy to help you!


