In this article we will introduce you to various ways in which you can easily and quickly invest in the cryptocurrency NEM. We will also show you how to create a NEM wallet and how to keep your NEM safe. Before you read our NEM serveral buying guides, you have to make an important decision. Depending on your decision, we will provide you with the right instructions to purchase NEM easily and safely.
Buy NEM: One important question
There is one important question you have to answer right now: Do you want to keep your NEM yourself and have full control over your property? Or do you hand over the responsibility to a exchange such as Binance or Litebit?
Please consider the following: Cryptocurrencies have been created to develop a financial system that does entirely without middlemen, such as banks and other financial institutions. Because of this it is in our opinion desirable to keep your NEM in your own wallet. Only you will then have access to your NEM with your Private Key. If you keep your NEM on an exchange and the exchange is the victim of a hacker attack, then you have no claim against the exchange. In the past, many NEM exchanges were already targeted by hackers and several millions of crypto have been stolen.
Therefore we suggest you to think carefully about whether you really want to keep your NEM on an exchange. However, for beginners it can be complicated to operate a wallet. Because of that we provide an easy and simple instruction (further down in this article) how to create a free NEM wallet.
But at first we present to you several tutorials on buying NEM from these exchanges: Kriptomat, Litebit, Coinmerce and Binance.
Buy NEM (XEM) on Kriptomat
About Kriptomat
Kriptomat currently offers over 30 cryptocurrencies for purchase via SEPA bank transfer, credit card or Neteller. The biggest advantage of the exchange is the simplicity of use. According to the motto “Crypto for everyone” the focus is on a modern and clear user interface. This allows really everyone, regardless of experience level, to buy cryptocurrencies.
However, we do not want to say that Kriptomat is only recommended for beginners. From our point of view, there are good reasons for experienced investors to use the exchange. For example, it is very trustworthy despite its young age. This is shown by two licenses that Kriptomat has received from the government in Estonia for the sale and custody of digital assets. But this is by far not our top argument for Kriptomat. It is much more the very low fees that come with the purchase of NEM. Unlike other exchanges and brokers, Kriptomat does not charge a price premium, the so-called “spread”. There are only the following transaction fees:
| Transaction | Fee % | Minimum |
|---|---|---|
| SEPA (Euro to crypto) | 1.45% | 1,45 EUR |
| Zimpler | 2,89 % | |
| Skrill | variable | |
| Neteller | variable | |
| SEPA sell (crypto to Euro) | 1,45% | 1,45 EUR |
| Credit card >100 EUR | 3,65 % | |
| Credit card <100 EUR | variable |
Registration and verification
As Kriptomat is registered in Estonia, the exchange is subject to strict European regulations to prevent money laundering and terrorist financing. Due to this, Kriptomat is obliged to require extensive data and proof from its customers (analogous to opening a bank account in Europe). Before you can buy only one NEM, you have to register and fully verify.
To do so, go to the official website kriptomat.io* and click on the orange “Register” button. First you only need to enter your first and last name, an email address and a password. However, this was just the beginning. Before you can buy NEM, Kriptomat has to collect a lot of additional information and evidence from you. Start with your telephone number. After entering it on the website, Kriptomat will send you an SMS containing a verification code which you must enter on the website. This was step 2 of 4, but now you have to reveal your complete personal data (see screenshot).

At this point you have to enter your address (street, house number, city, country) and verify the information with a photo or a scan of your passport or ID card. This process, which is often very annoying at other exchanges, was solved very easily by Kriptomat. If you have done the registration on your desktop PC so far, you can simply continue the registration process on your smartphone.
Kriptomat will send you an SMS with an individual link. This allows you to take a picture of your badge on your smartphone and upload it to Kriptomat. You do the same with a selfie of yours. The registration is then (basically) complete, which means that you have the following limits at your disposal:
| Transaction | Limits |
|---|---|
| Daily deposit and withdrawal via SEPA | 25,000.00 EUR |
| Monthly deposit and withdrawal via SEPA | 200,000.00 EUR |
| Deposit and withdrawal in cryptocurrencies | no limit |
| Daily limit for other payment methods | 500.00 EUR |
| Monthly limit for other payment methods | 5,000.00 EUR |
Looking at the table, you will probably notice that the deposit limits are very low (up to 500 euros per day), apart from the SEPA bank transfer. Therefore, if you want to buy higher amounts (> 500 euro per day) and benefit from the lowest fees, there is no way around a SEPA bank transfer. However, you still have to prove that the bank account belongs to you. Only then can you deposit money via SEPA and buy NEM via SEPA. This additional verification step falls under the other payment methods: Neteller, Skrill and credit card. A good overview of the whole verification process can be seen in the following video from Kriptomat:
Buy NEM on Kriptomat
Now that you have completed the registration and verification process, the actual NEM purchase process should be a breeze. To do this, click on “Buy/Sell” (step 1) in the main menu and then select the “Buy” tab (step 2). Then you can select NEM.
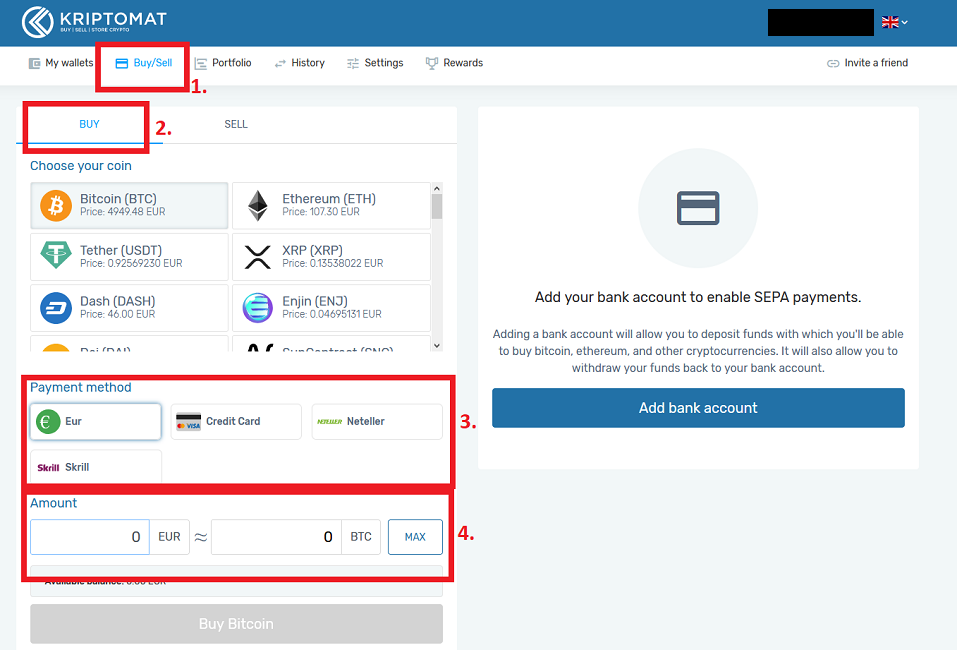
In the area below, under “Payment methods”, you will then have the payment options mentioned above (step 3). In the fourth step (see screenshot) you enter the amount you want to invest and click on “Buy NEM”. Finally, you will be taken to a new overview where the transaction fees are displayed. If everything is correct, you can finally complete the purchase by clicking on “Confirm transaction”. The purchased NEM should then appear in your “My Wallet” area within a few seconds. If you would like to watch the process again, we recommend the following tutorial by Kriptomat:
Buy NEM (XEM) on Litebit
Buy NEM in 5 minutes – step by step
The NEM-Exchange Litebit is based in the Netherlands. We have been a regular customer of the exchange for more than 4 years now and are completely satisfied with both the customer service and the very user-friendly interface. The NEM purchase is really very simple and reliable.
Litebit also attaches great importance to security, as your account is secured with several features. Until today Litebit has never been hacked. Litebit does not offer a wallet for NEM coins, so you have to store them on an external wallet. We’ll show you how it works in detail. In the first step you have to create an account on Litebit.eu. Click on the following link which will take you directly to the official site where you can register*.
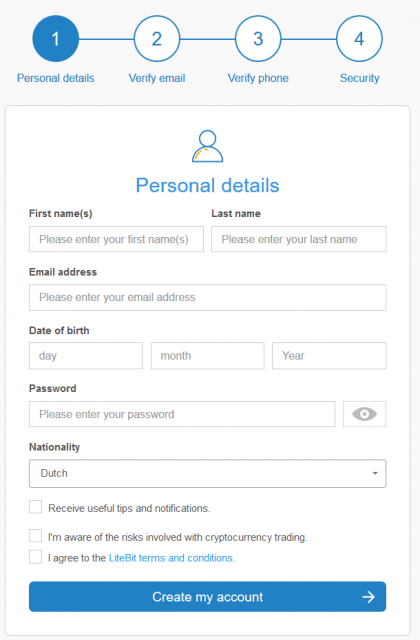
Since you are conducting transactions with Fiat currencies, you will need to provide Litebit with some personal information. This is now necessary on all exchanges worldwide and is enshrined in law. Enter all necessary information and click on “Create my Account”. Litebit will immediately send you an email containing a confirmation link. Click on this link to open your account and confirm your email address.
The next step is to enter your phone number. Litebit will send you an SMS with a code you have to enter at Litebit. Furthermore it is mandatory to either set up the 2-factor authentication or to activate the confirmation via SMS. The default setting is SMS dispatch. However, we recommend that you enable 2-factor authentication. This increases the security of your account enormously. Once you have successfully completed all this, you will be taken to the Litebit homepage and can log in to your account.
Limits for the purchase of NEM
With Litebit there are different verification levels which correspond with trading limits for the respective level. In the first level, “Tier 1” you can trade 350€ per day, 1050€ per week and 4.200€ per month on Litebit. If you want to increase these limits, you must unlock additional levels. The following table gives a good overview of the respective levels and limits (the levels are called “Tiers” on Litebit).
Depending on your level of verification, limits apply to your deposit methods:
To reach the second level, Tier 2, you need to verify your address. Scan the front and back of your identity card and upload it as a PDF file to Litebit. Besides, you have to prove your residence. Make a copy of your last electricity or mobile phone bill and upload it to Litebit.
To reach Tier 3 you need to make a short Skype call with a Litebit representative. You have to answer some short questions and hold your ID in the camera. Normally the call does not last longer than 2 minutes. In level 3 you can trade NEM worth 500.000€ per month.
NEM buy by credit card, bank transfer or PayPal
The actual buying process is very simple. Click on the “Buy” tab in the menu and then search for NEM in the search field. Now click on the cryptocurrency NEM.
Now you can enter your amount, how much NEM you want to buy. As Litebit does not offer its own wallet for NEM, the setting “External Wallet” is already pre-selected. In the green column you have to enter the receiving address “Receive adress”, where your NEM should be sent to.
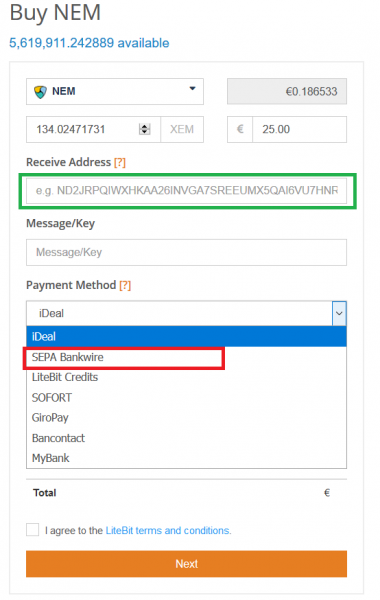
The best possible security can be offered by a hardware wallet such as the Ledger Nano X (our test winner) or the Trezor Model T. Especially if you are investing large sums in NEM or cryptocurrencies, you should consider buying a hardware wallet. If you have decided where you want to store your NEM, you have to insert the reception address of your wallet in the column “Receive Address”, framed in green in the screenshot. Then you have to choose a payment method.
The cheapest option is the bank transfer, “Sepa Bankwire”, as this has the lowest fees, framed in red in the screenshot. If you have selected Sepa Bankwire, you can click on “Next”. In the next step you will be told to which bank account you have to transfer the corresponding amount. Watch out for the following:
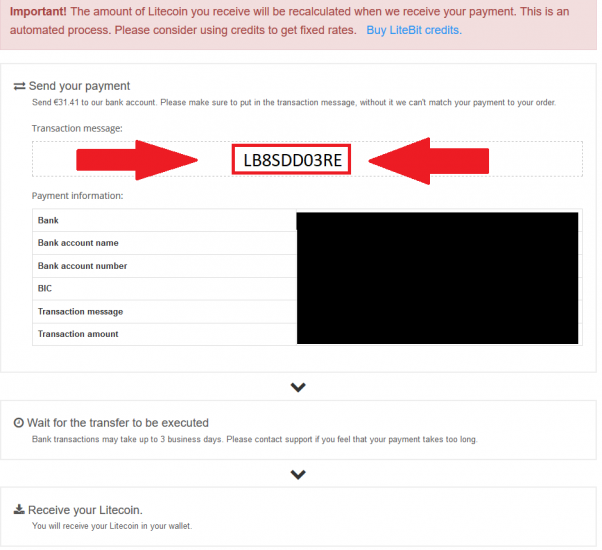
When making your transfer, you must specify a specific purpose. Litebit calls this “Transaction Message”. Litebit can only immediately assign your bank transfer in the system if you specify this name as the reason for payment. As soon as Litebit has received your transfer, your NEM will be sent to the wallet immediately. The following screenshot shows the “Transaction Message”.
Buy NEM on Coinmerce
NEM investment: 5-minute guide
Coinmerce is a Dutch exchange that offers the direct purchase and sale of cryptocurrencies by credit card, bank transfer or PayPal. The company behind Coinmerce is Coinmerce B.V., a Dutch limited liability company based in Amstelveen. The broker was founded in 2017 and enjoys increasing popularity and growing user numbers.
Coinmerce was originally founded by crypto enthusiasts to make buying and selling digital currencies as easy as possible. The primary objective is to make “cryptocurrencies accessible to all”. Coinmerce has developed an all-in-one app for the smartphone that offers all the features like the desktop version of other exchanges. Furthermore, Coinmerce has developed a wallet for almost all offered currencies to make the handling as easy as possible.
This video gives a good overview of all available features of the marketplace:
To buy NEM, you must first create a new account at Coinmerce. Click on the following link to go directly to the registration page*. Click on the red button “Create account”. Now you need to enter some personal information about yourself to complete the registration process. You must make sure that your first name, surname and address match the data on your ID card.
Once you have successfully entered all the data, you must assign a password and then click on “Register”. Coinmerce will send you an email with a confirmation link. So go to your mailbox and click on the link to activate your account. Now you can register with Coinmerce. Since you will be making transactions with Fiat currencies such as the Euro, you will need to prove your identity. Upload the necessary documents to your account to verify your identity, address and residence.
>> Buy NEM on Coinmerce on Coinmerce now* <<
Limits for the purchase of NEM
As with other exchanges, Coinmerce has different levels of verification. Depending on your level, you can buy daily, weekly or monthly cryptocurrencies up to an upper limit.
- Level 1 Bank Verification
To reach the first verification level you need to verify your bank account. To perform the verification, you must first click on “Settings” –> “Security Settings” –> “Bank Account”. Here you find all further instructions, where you have to transfer 0,01€ with the special purpose.
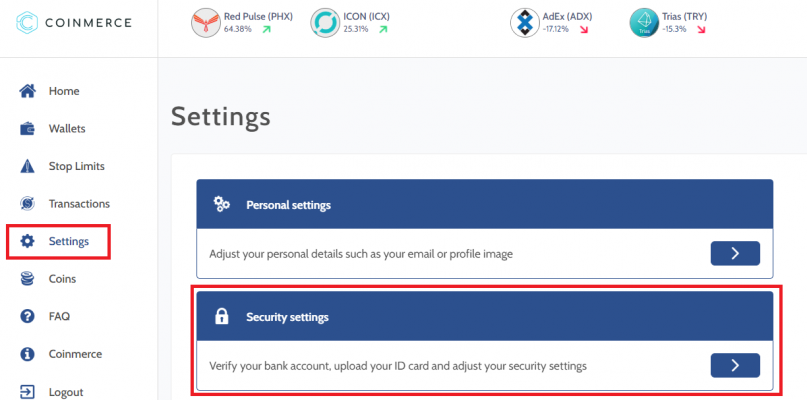
- Level 2 Identity verification
For the second level you need to upload a valid passport or driver’s license to Coinmerce. At this level you can trade up to 20,000€ per day and 60,000€ per week.
- Level 3 video call via Skype
If you are not satisfied with the limits, you can also unlock Level 3. Coinmerce needs proof of your source of funds, proof of residence and a Skype call. You have to make an appointment with the Coinmerce support.
The following table provides an overview of verification levels, processing times, transaction fees, and payment methods:
A special feature of the platform is the Coinmerce Coin. A Coinmerce Coin is always worth exactly one euro. This means that the Coinmerce Coin is linked to the value of the euro and comparable to a stablecoin, like Tether. The Coinmerce Coin should give users the opportunity to secure their returns or cash out quickly. Furthermore, the transactions with the Coinmerce Coin are completely free of charge. In addition, the transaction time is effectively shortened. These advantages can be decisive in practice, especially if you want to trade quickly.
NEM buy by bank transfer or GiroPay
The actual purchase of NEM is done very quickly. You have to go to the homepage of Coinmerce and select NEM.
In the next step you have to decide if you want to use the wallet of Coinmerce or send NEM to an external wallet like the Exodus Wallet. If you want to use the wallet of Coinmerce, you have to choose a payment method and then click on the numbers button. Your information will then be reviewed and the transaction confirmed.
If you want to transfer your NEM to the Exodus wallet or another external wallet, you have to activate the slider. Then you will be shown a field where you have to insert the external wallet receiving address. There is also a small fee of 0,30€. If you have copied the “Receive Address” e.g. of your Exodus Wallet and pasted it into Coinmerce, you can click on “Pay Now”.
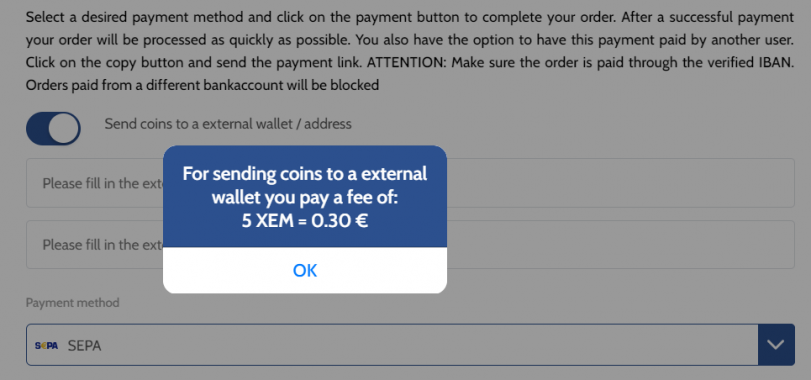
The Coinmerce wallet is a simple solution, but not optimal in an emergency. It is better to use an external wallet. Beside the presented Exodus Wallet there are very cheap Hardware Wallets which offer a very strong protection. This includes the Ledger Nano S or the Trezor One Hardware Wallet.
>> Buy NEM on Coinmerce on Coinmerce now* <<
Trade NEM on Binance
Binance is one of the largest and safest crypto exchanges in the world. Previously it was not possible to buy cryptocurrencies by credit card on Binance. That’s changed in 2019. Bitcoin, Bitcoin Cash, XRP, Ethereum and Litecoin can now be purchased by credit card on the exchange. However it is not possible to buy NEM directly on Binance. You have to trade one of the following cryptocurrencies against NEM:
- Trade Bitcoin against NEM
- Trading Ethereum against NEM
- Tether for NEM trading
The first step is to create an account with Binance. Click on this link, which will take you directly to the platform registration*. Unlike other exchanges, you don’t have to verify your identity. Your current trading limit is 2 bitcoins per day. In order to use the full range of Binance functions, we recommend that you verify your identity. Then your daily trading limit will increase to 100 Bitcoin per day.
Step 1: Buy Bitcoin by credit card to trade NEM
Once you have successfully registered, you can start purchasing Bitcoin by credit card. Click on the menu item “Funds” and then on “Buy with Credit Card”. You arrive at the following view. Now you have to select BTC (Bitcoin).
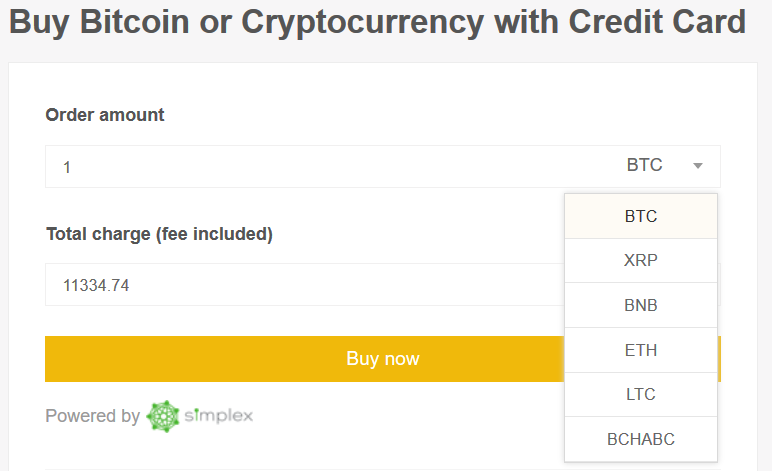
It is important to note that Binance works together with the third-party provider Simplex to handle the purchase process. We have summarized the most important steps for you:
- Select BTC and the Fiat currency you want to pay in, Euro or USD.
- Fill in all required fields of personal data.
- Verify your email address and phone number with a code.
- Enter your credit card information
- Upload all documents required to verify your identity (front and back of your passport)
Once you have successfully completed this step, the Bitcoins should soon arrive on your Binance wallet. Before and after the purchase there are some special features to consider:
- The indicated amount of Bitcoin is based on the current Bitcoin price and is not final, but will be calculated later. If the exchange rate fluctuates more than +-2.5%, you will be asked to confirm the transaction again by e-mail.
- Once the payment is complete, you can view all details of your payments at any time in the payment history.
- The fee charged by Simplex per transaction is 3.5% or USD 10, whichever is higher.
- The purchase limit is 20,000 USD per day and 50,000 USD per month.
- The minimum amount for a transaction is currently USD 50.
Step 2: Trade Bitcoin against NEM
As soon as Bitcoin has arrived on your wallet from Binance, you can trade Bitcoin against NEM. We will show you an example of how you can trade BTC for XEM. Alternatively, you can transfer Bitcoin from another wallet or exchange to Binance and then follow the same steps.
If you do not yet have a Bitcoin, you can buy it on Litebit by bank transfer or credit card and send it to the Bitcoin Wallet address of Binance. To find out the receive address of your wallet, click on “Funds” in the navigation bar and then on “Deposit”. Enter BTC in the search field and click on it.
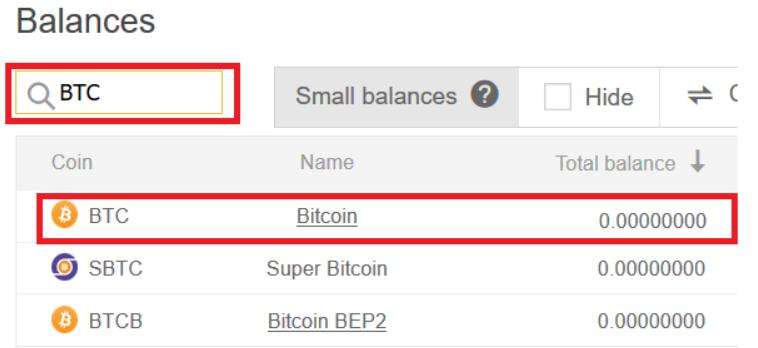
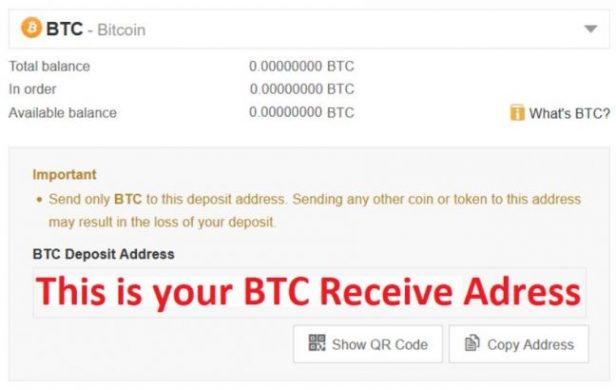
You will be taken to a new overview showing your Bitcoin Receive address. You have to give this address in the purchase process at Litebit or another exchange. This is where your BTC will be sent.
As soon as your Bitcoins have arrived at Binance, you can continue with the purchase process. Next to the Binance logo is a tab with the name “Exchange”. Click on it and then on “Basic”. You get to a new overview. Now enter XEM in the search field in the “BTC” tab and click on XEM/BTC. Now you’re getting a new view. You can buy NEM either via “Limit”, “Market” or “Stop-Limit”.
Step 3: Trade Bitcoin against XEM
A “limit order” is a buy order that is only executed when the price you set is reached. This means that your trade will only be executed when the market price reaches your limit price. If this is not the case, your trade remains open. You can delete the trade at any time (before execution) and re-enter it if necessary. A limit order should always be used when you have time and are not in a hurry.
In contrast, the “market order” is executed immediately at the current market price. This is why the Market Order is particularly suitable for beginners and investors who bring little time with them. Since you want to trade your Bitcoin against NEM, you have to enter in the left column how much NEM you want to buy. Once you have entered your desired amount, you can click on “Buy XEM”.
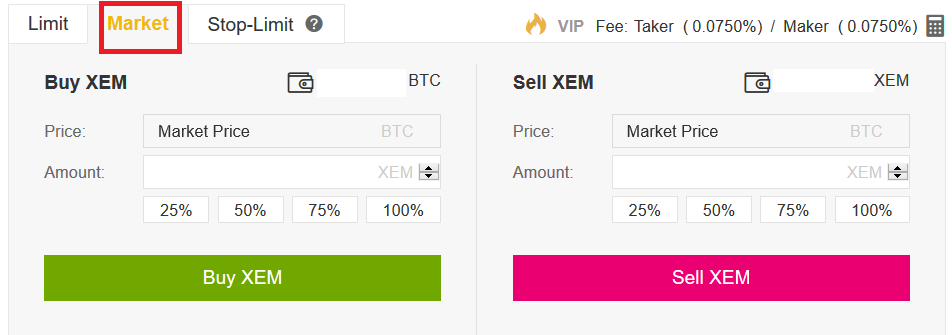
Your purchase order will then be executed within seconds. Now you’re the proud owner of NEM Coins. Although Binance is considered very secure, in May 2019 the exchange was the victim of a hacker attack in which 7,000 Bitcoin could be stolen. Therefore it can be advisable to transfer your NEM to an external desktop or hardware wallet. We have tested more than 8 different hardware wallets and show you which model is the best. Just have a closer look at our hardware wallet test review.
Create a NEM wallet
There are many NEM Wallet providers on the market who all meet different security requirements. We have had very good experiences with the NEM Exodus Wallet. In the following we will show you briefly where you can download the wallet and how to use it in practice.
First you have to download the software from the official website. Click on the following link (click!) and download the appropriate software for your operating system. We are using a Windows PC, so we clicked on the left button “Download Windows App”.

If the wallet is successfully installed, you will receive a notification. The installation should not take longer than 30 seconds. Now click on the icon on your desktop and start the wallet. You get to this surface:
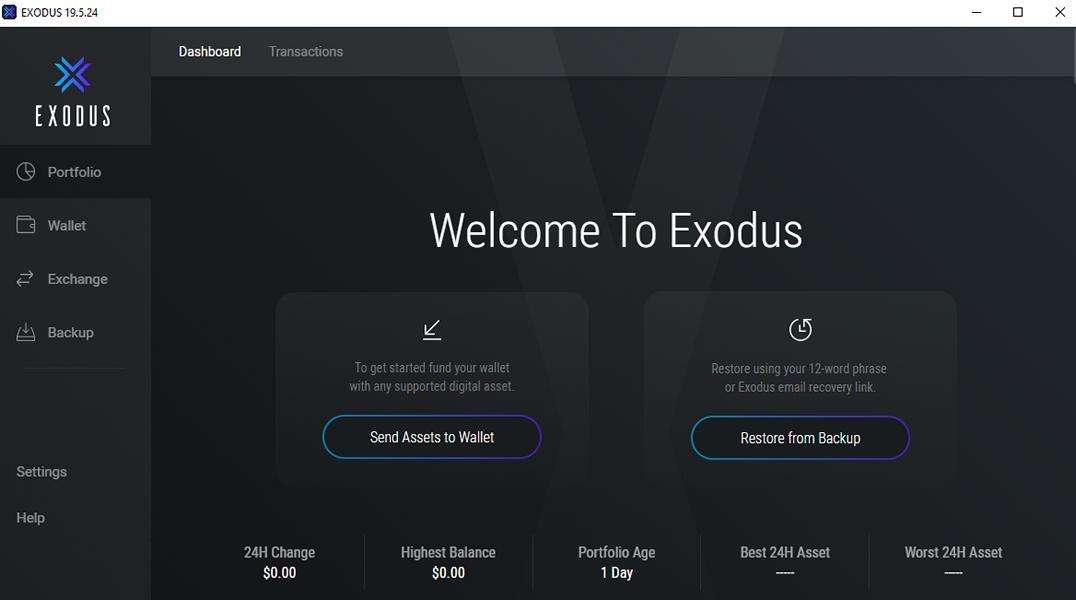
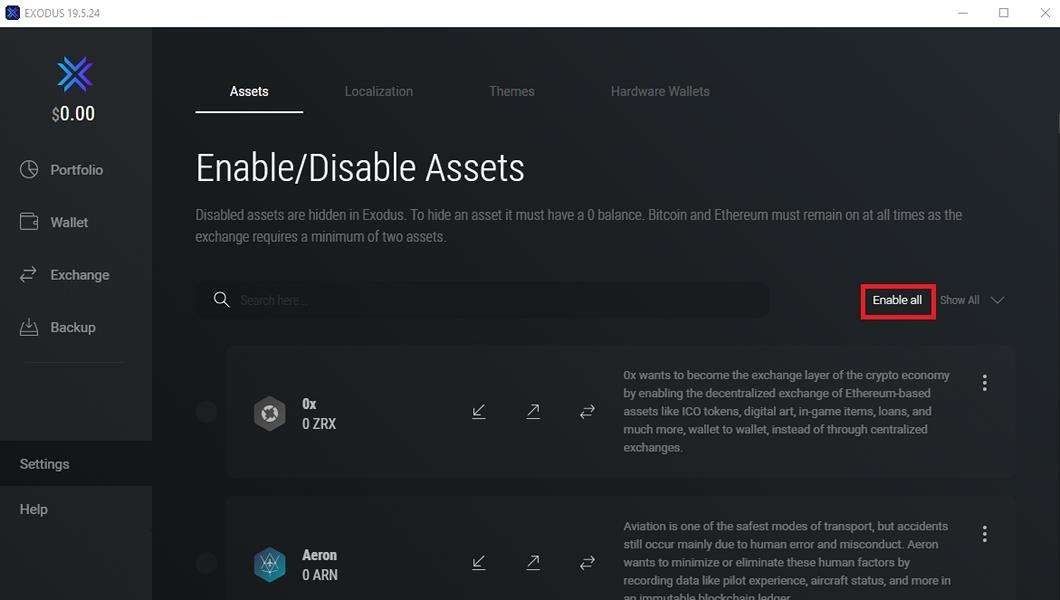
Currently only the most prominent coins are activated in Exodus wallet. To see NEM, click on settings and then in the lower right corner on “Enable all”, marked red in the screenshot.
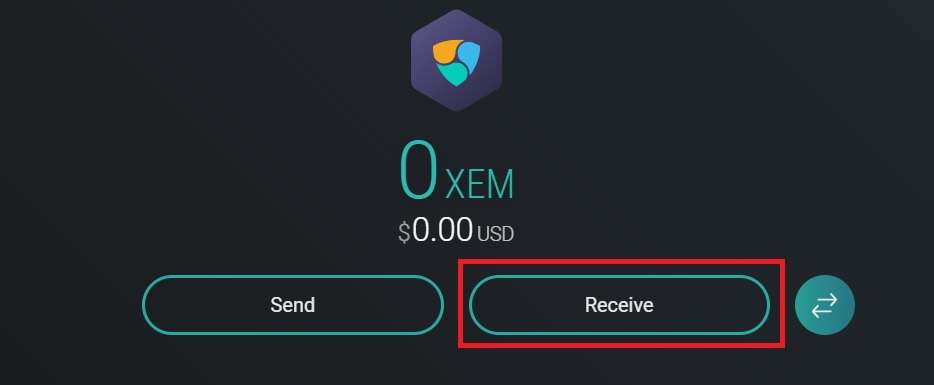
To get the receiving address “Receive Address” from NEM, you have to enter NEM in the search field and click on NEM. Then click on the “Receive” button, framed in green.
Now you will be shown an address. This is your NEM receiving address if you want to send NEM to your Exodus wallet. You can now copy the address and paste it to Litebit in the column “Receive Address” or any other exchange. Normally, your NEM should be visible on your wallet within a very short time if they have been transferred by Litebit or another exchange.
You can find the current course of NEM in our NEM price overview. If you would like to check the prices of Bitcoin, Ethereum, Ripple or Litecoin, take a look at our course overview page . We provide historical courses of over 2,000 altcoins for you.
Subscribe to our daily newsletter!
No spam, no lies, only insights. You can unsubscribe at any time.
If our purchase instructions have helped you, please leave a review:
[ratings]If you have questions or suggestions, write us gladly a comment, we help you gladly further.


